
A. Access Chart of Accounts in Docyt
C. Upload COA .csv directly from the COA page
I. Edit Business Report Mapping in Case of Adding a New Account
A. Access Chart of Accounts in Docyt:
1. The Reconciliation Center in Docyt allows users to access the 'Chart of Accounts' feature.
2. Access the Reconciliation Center by following these steps: How to access the reconciliation center.
3. To access the 'Chart of Accounts' feature in the Reconciliation Center, simply navigate through the main menu options and click 'Chart of Accounts'.
4. Click on the 'Update' button to synchronize the QuickBooks Online (QBO) chart of accounts with the chart of accounts in Docyt.
5. To download the complete chart of accounts for a specific business, click on the ellipsis menu and select 'Export as CSV'. This will allow you to save the chart of accounts as a CSV file for easy access and analysis.
B. Add New Account:
1) To add new accounts, click on the blue plus sign in the upper right corner.
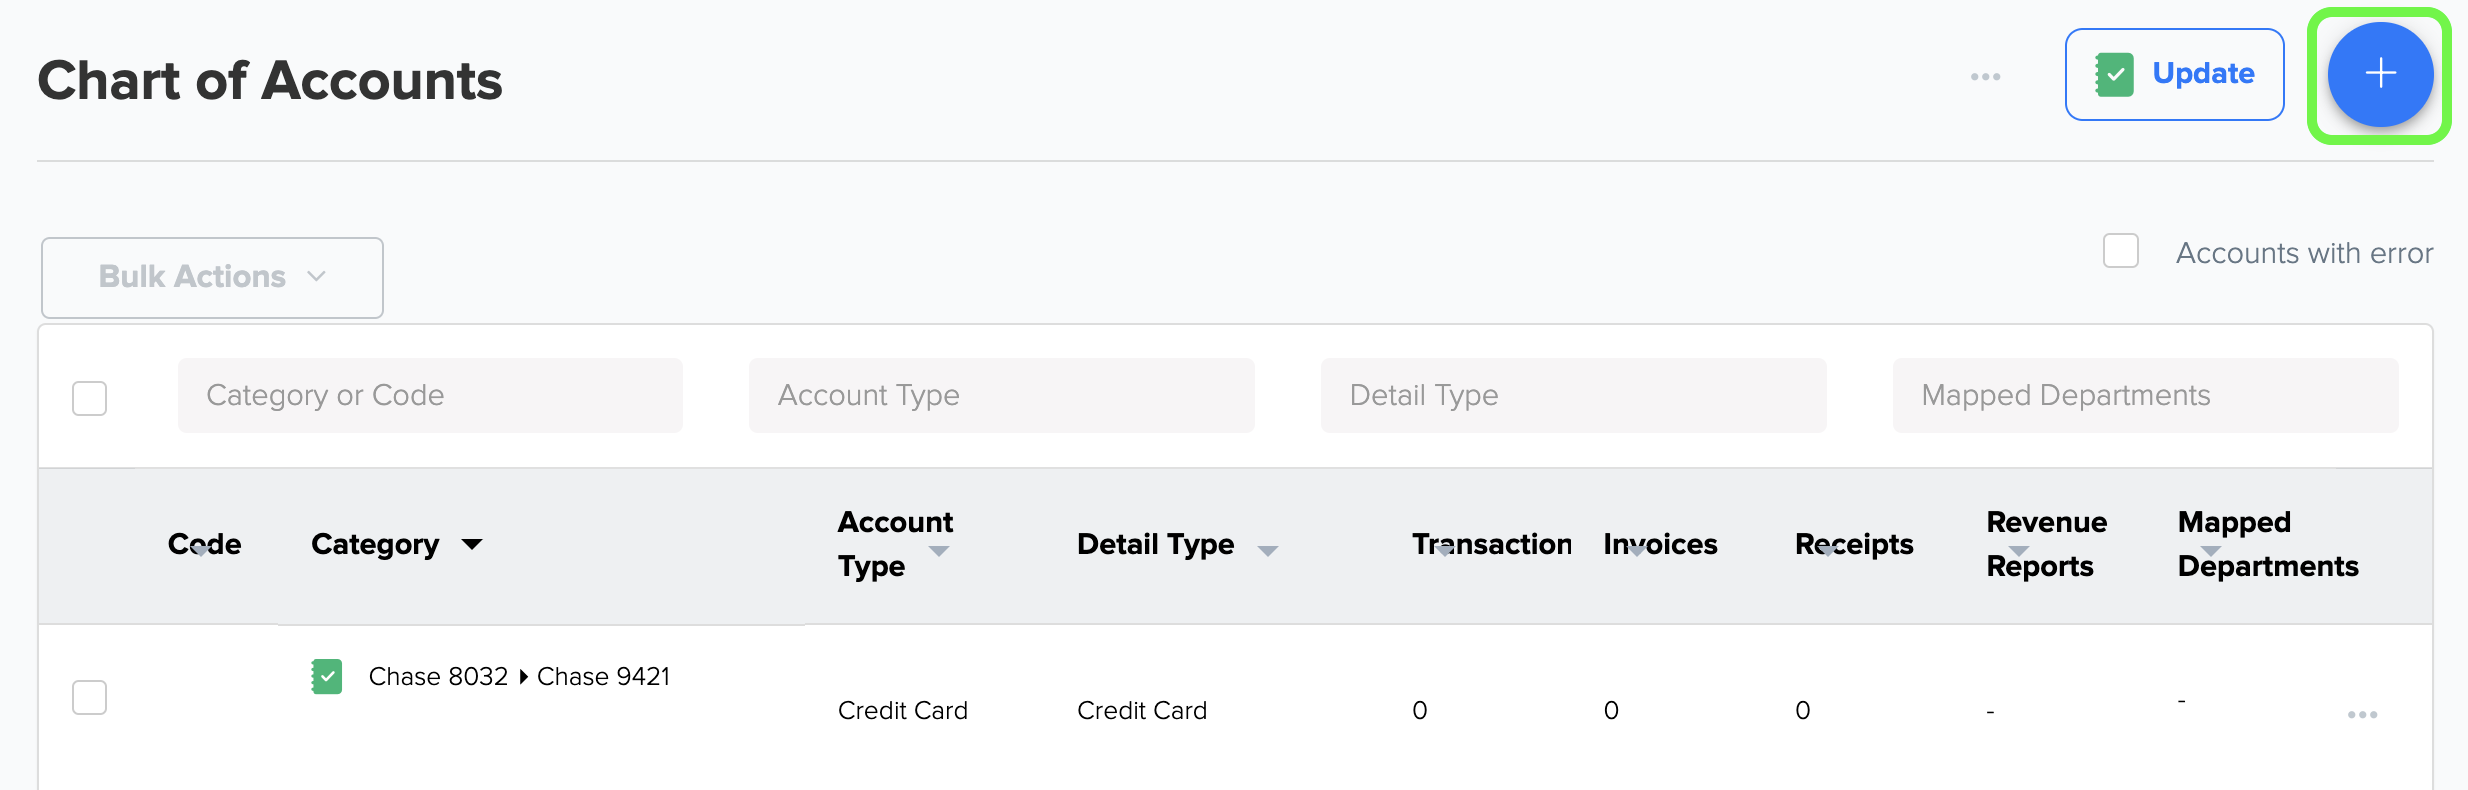
2) A new section will appear on the right side where you can add Account Type, Detail Type, Category Name, Category Code, and Parent Category to create a new custom category.
3) If your Docyt plan includes departments, you will also have the option to add mapped departments when adding new income, expense, or cost of goods sold account types. This feature lets you easily associate specific departments with your accounts, providing a more organized and detailed financial overview.
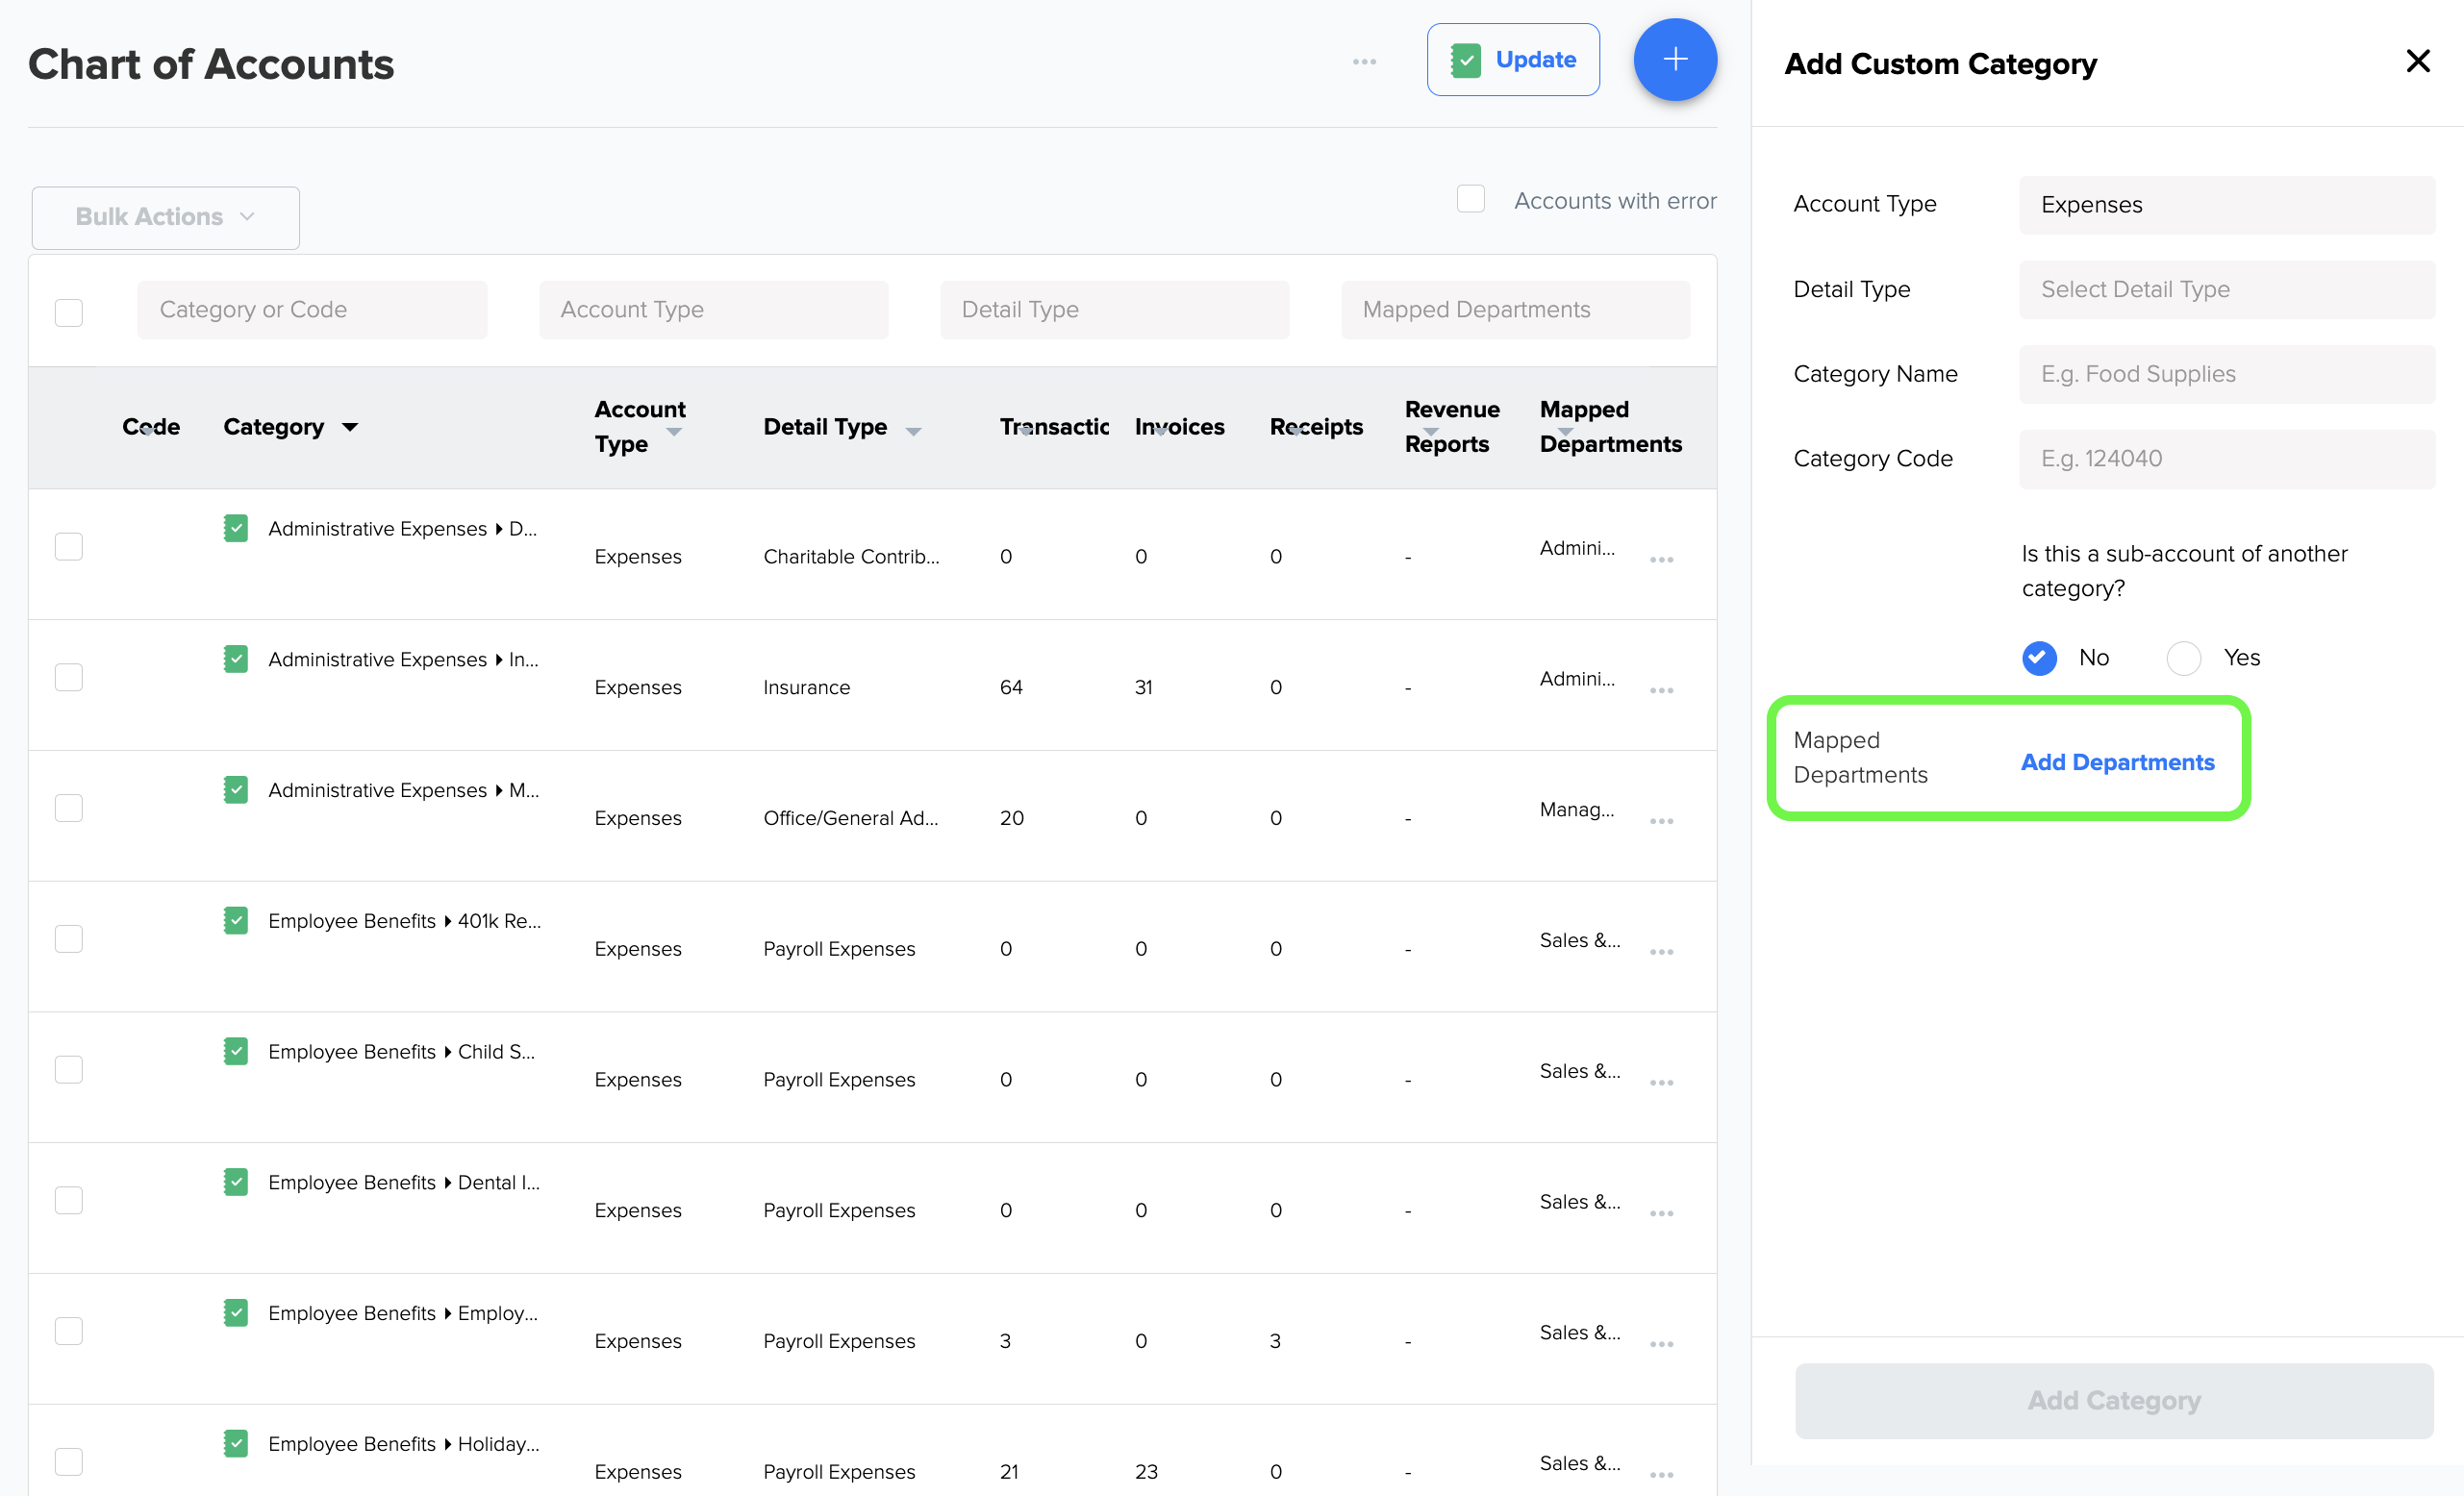
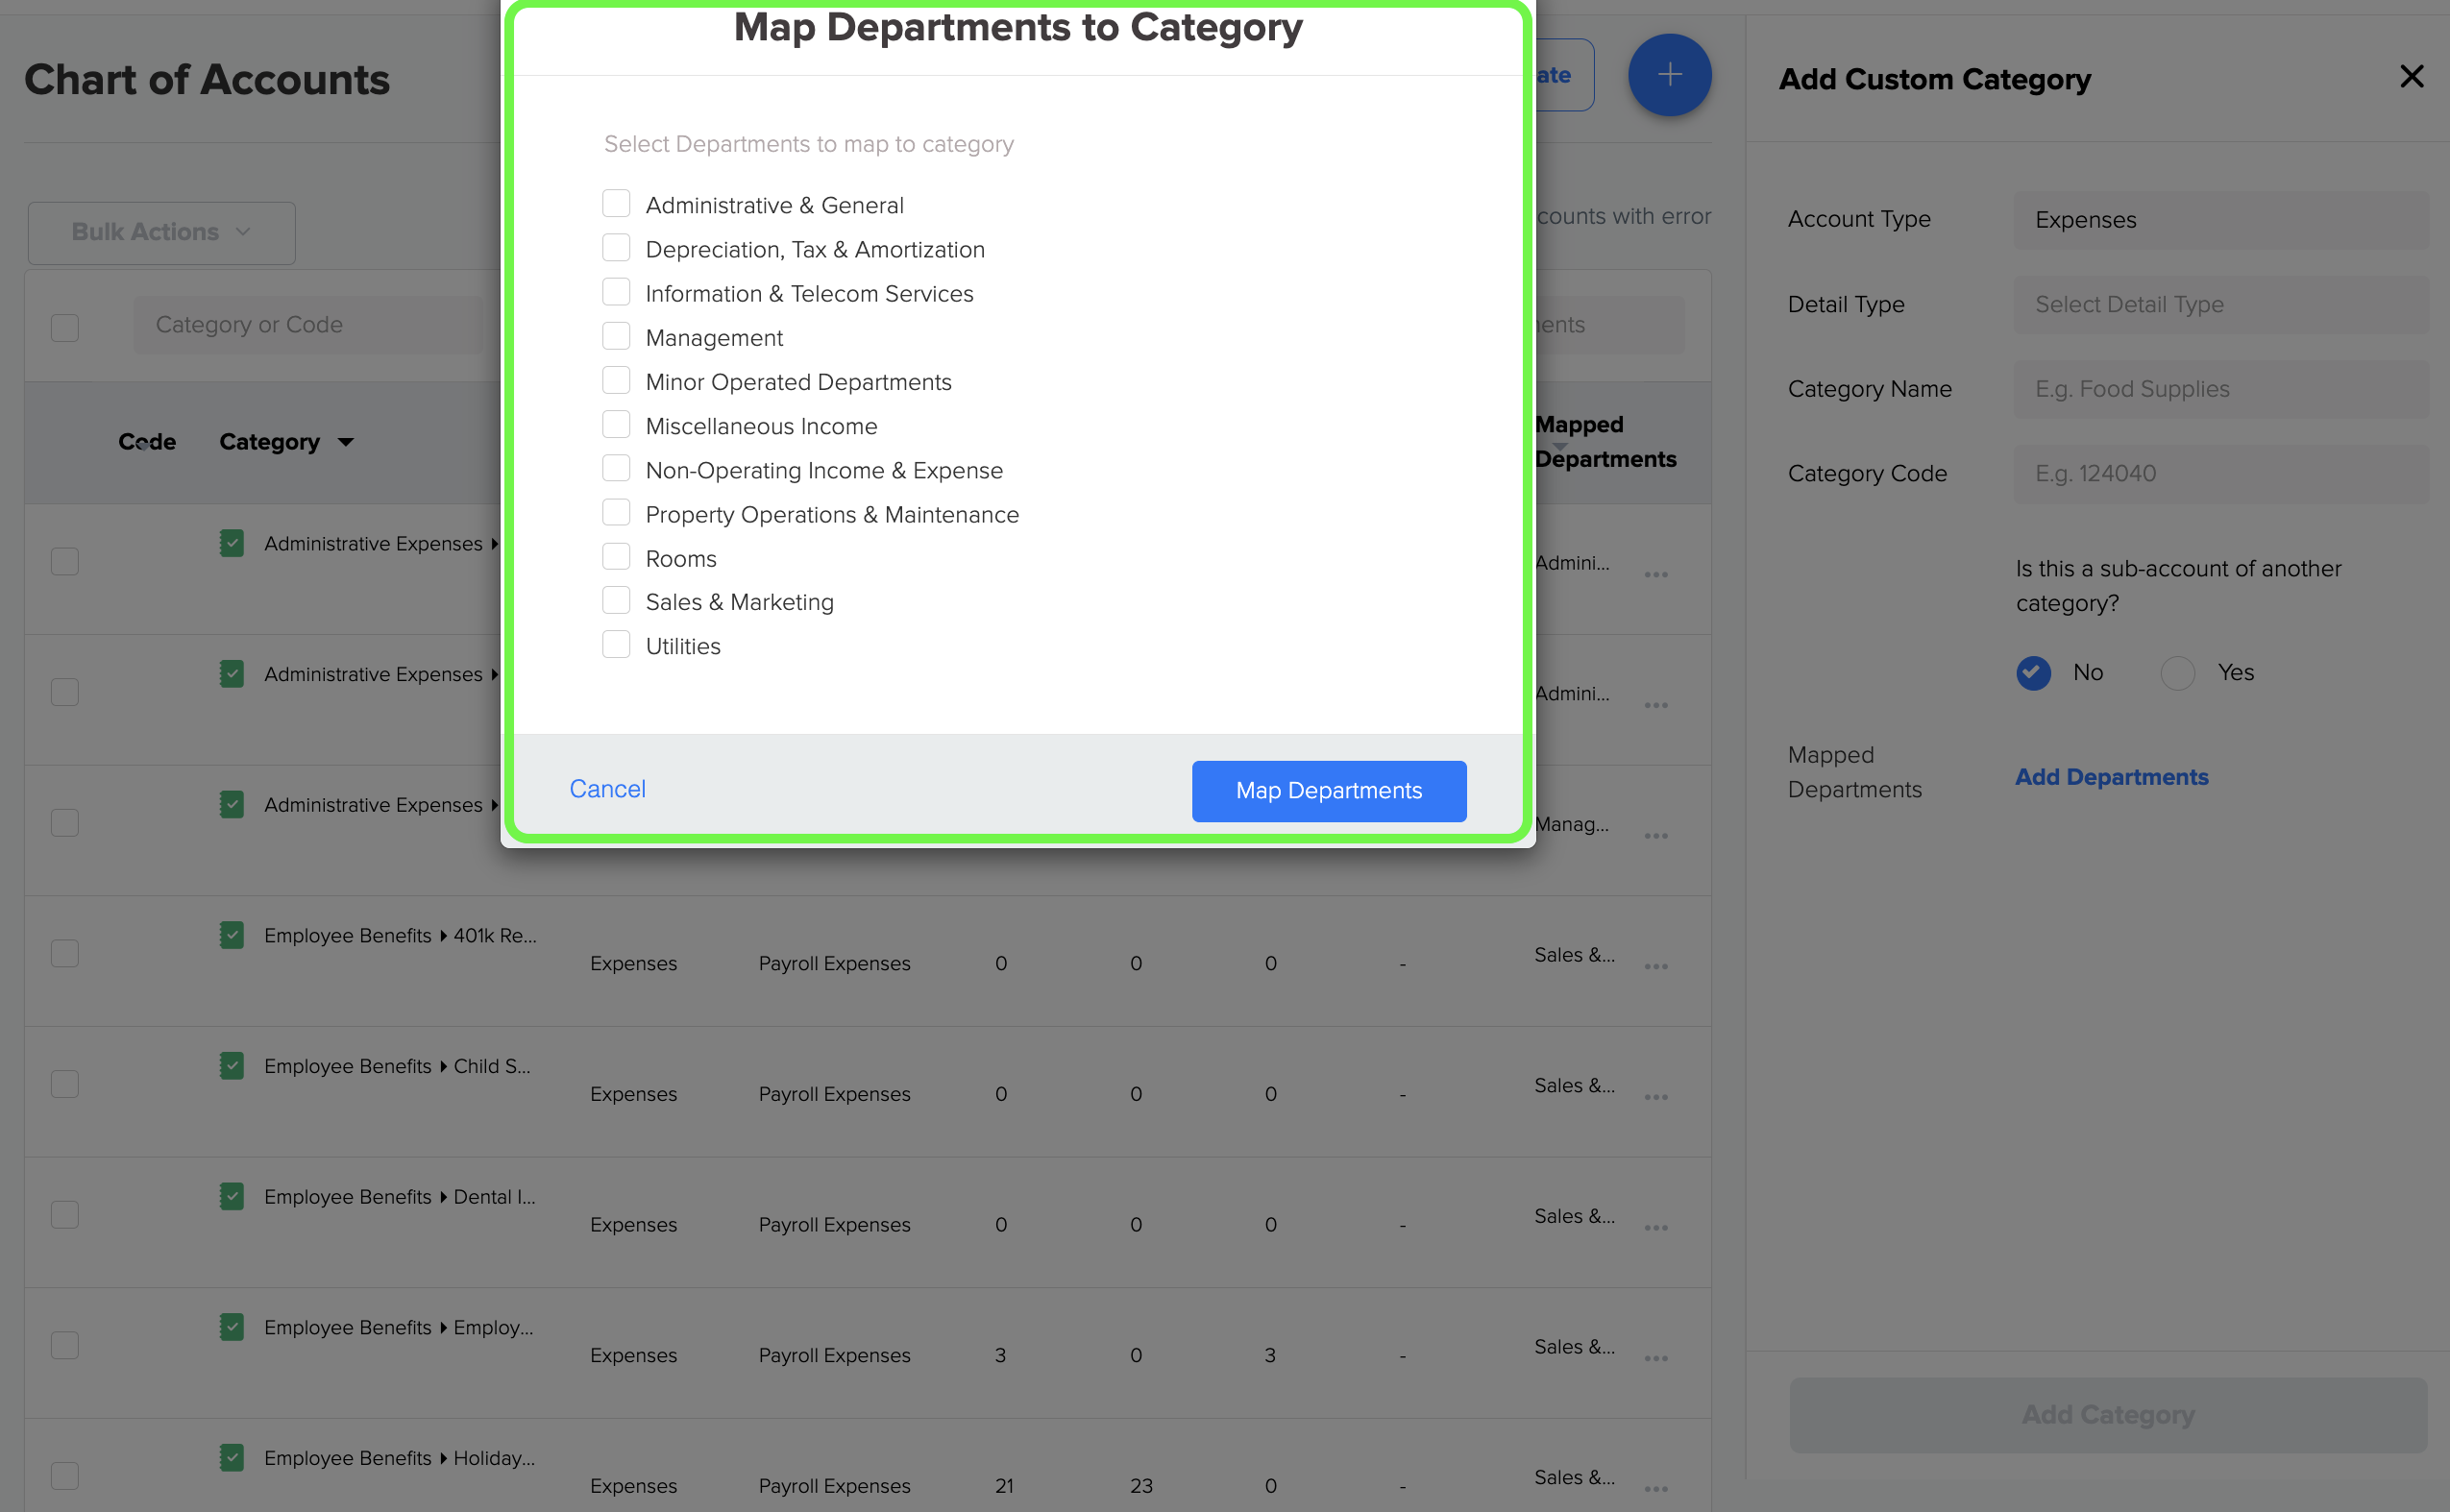
4) When you click 'Add Departments' in step 8, a dialogue box will open where you can select the department that needs to be mapped to the new category.
You can see the latest uploaded chart of accounts at the top of the list.
5) Clicking on the ellipsis icon in any row of the chart of account category will open a menu with additional options.
C. Upload COA .csv directly from the COA page
1) Go to the COA from the reconciliation center.
2) Click on the three dots (...) and select Import. 
3) Upload the .csv file from your computer. This will upload all .csv file data into Docyt.
.png?width=504&height=284&name=Chart%20of%20Account%20(3).png)
⬇️.png?width=500&height=281&name=Chart%20of%20Account%20(4).png)
4) Add the Account, Account, and Detail types, and click "Import".
5) A notification will pop-up demonstrating the list of COAs that have been updated, failed to upload, or already exist.

D. Edit Linking:
1) When you click on 'Edit Link to Ledger' in step 10, a section will appear on the right side, allowing you to change both the account in Docyt and the account in the Ledger (QBO) if needed.
2) In step 10, when you select 'Edit Accounting Category', a new section will appear on the right side of the screen. This section allows you to edit and update the specific details of the accounting category you are working with.
E. Move Items to New Category:
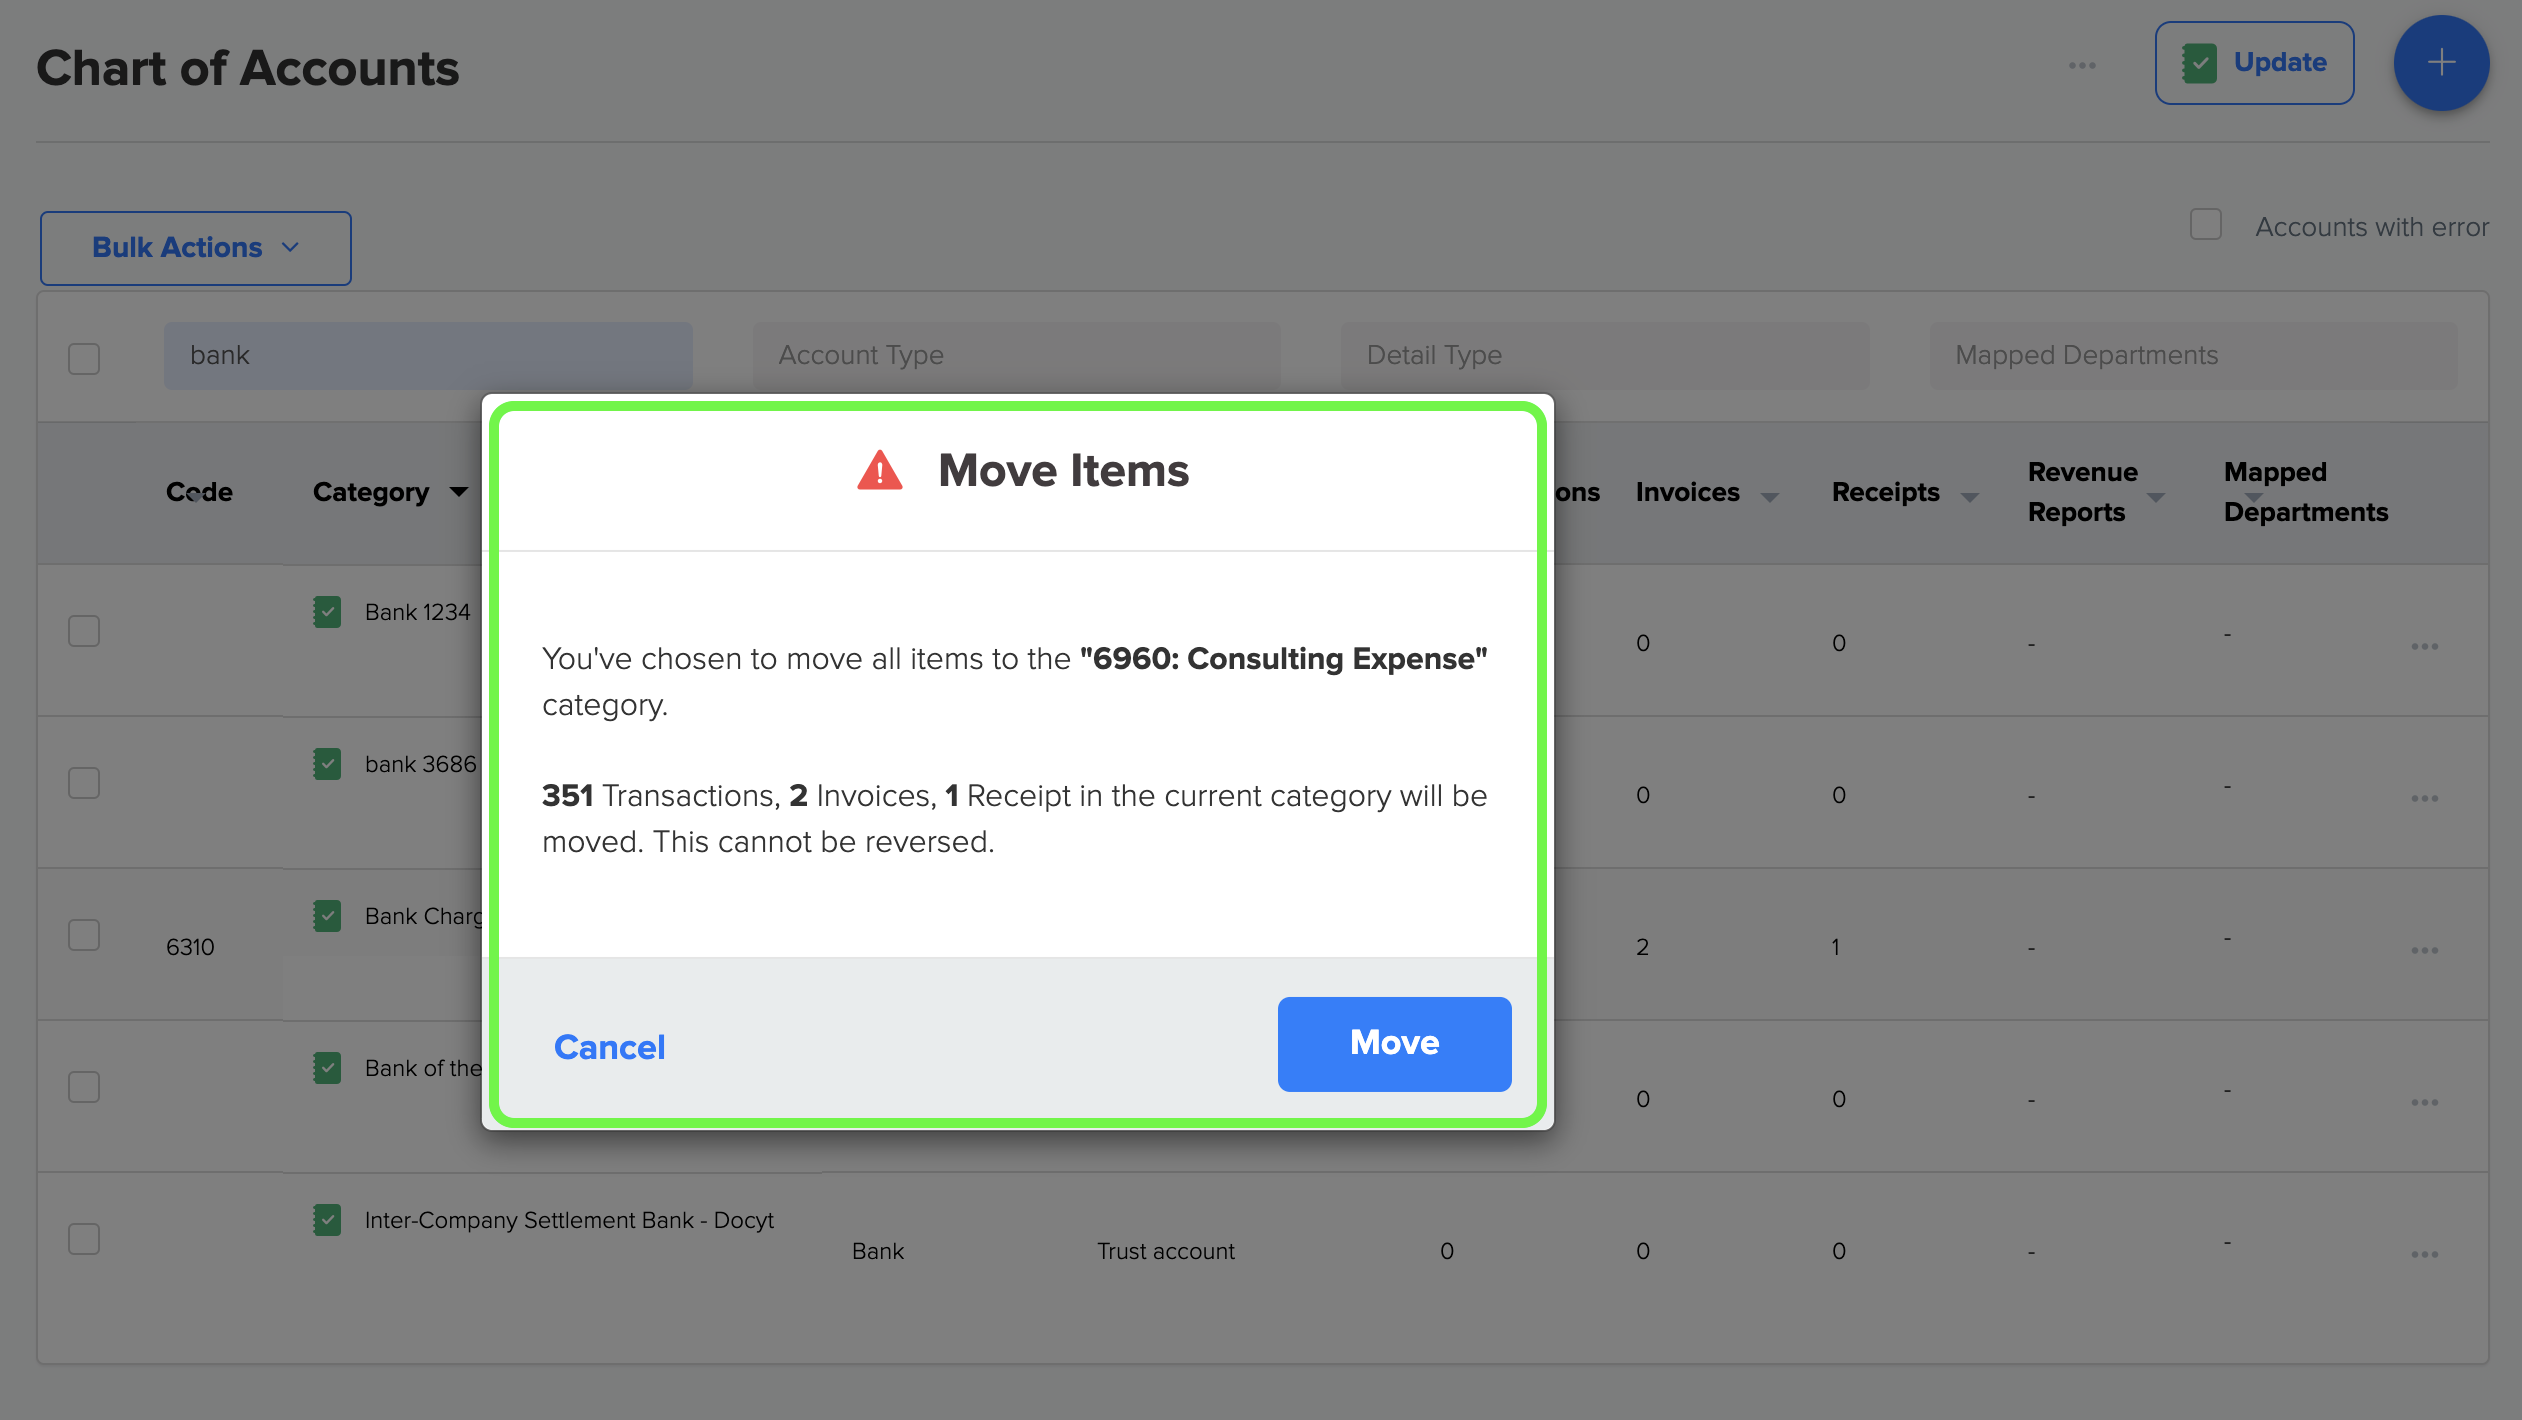
1) When you click "Move Items" in step 10, a section will open on the right side where you can select the new category to which you want to move the transactions, invoices, and receipts from the current category.

2) After clicking on 'Save' in step 18, a dialogue box will appear, providing information about the number of transactions, invoices, and receipts that will be moved to the new category. It will also warn that this action cannot be reversed. To proceed with moving the items, click on 'Move'.
F. Delete Category:
- When you click "Delete Accounting Category" in step 10, a dialogue box will appear that alerts you that this account will also be deleted from QuickBooks. Click 'Delete' to proceed.

G. Accounts with Errors:
- By selecting the 'Accounts with error' check box, you can view and identify only those charts of accounts that have errors. This feature helps you quickly identify and address account issues for better financial management.

H. Bulk Delete:
- To delete multiple categories, select the chart of accounts you want to delete and click on the 'Bulk Action' button. This will open a new menu called 'Delete Categories' designed explicitly for quickly deleting multiple categories at once.
I. Edit Business Report Mapping in Case of Adding a New Account
- After adding a new chart of accounts, updating the business report mapping is crucial to guarantee that the new account data is accurately transferred from QuickBooks Online (QBO) to Docyt.