Accounts Receivable for The UPS Store®
  1. Help Center
  2. Accounts Receivable for The UPS Store®

Managing Accounts Receivable with Docyt: A Guide for UPS Store Owners

Table of Content

A. Introduction to Accounts Receivable for UPS Stores

B. Automatic Validation of UPS Store Franchise Reporting System Integration for Accounts Receivable Data


Accounts Receivable and House Account tracking is available with select Docyt plans and not available with the Docyt Starter Plan. 

A. Introduction to Accounts Receivable for UPS Stores

Discover the benefits of using the Accounts Receivable module in Docyt, which is designed exclusively for UPS store owners. This user-friendly module lets you easily view house account invoices and track payments, credit memos, customer lists, and vendor profiles. 

1. Click 'Revenue Reconciliation' and 'Accounts Receivable' in the menu bar.

2. Menu items in the Accounts Receivable module are as follows:


Invoices

  1. To access the 'Invoices' tab in the 'Accounts Receivable' module, go to the left navigation and click the 'Invoices' option.
  2. Click on any invoice to view its details, including customer information, item/service, invoice date, and amount.

  3. To view the invoice in QuickBooks, click on the green 'View in QuickBooks' link in the window's top right corner.
  4. Use the filters in the header of the Invoices menu to sort by customer name, Invoice number, Bill Date, Payment Date, Payment Type, and minimum and maximum amount.


Payments

  1. To access the 'Payments' tab in the 'Accounts Receivable' module, simply navigate to the left navigation menu.

  2. Click on any payment to view its details.
  3. To view the payment in QuickBooks, click on the green 'View in QuickBooks' link in the window's top right corner.

Credit Memo

  1. To access credit memos in the 'Accounts Receivable' module, navigate to the 'Credit Memo' tab in the left navigation.

Customers

  1. To access your customers list, you can go to the 'Customers' tab in the left navigation.
  2. You can view each customer's details and information.
  3. If you need to view a customer's details in QuickBooks, click on the green book icon on the right side of the screen.
  4. By clicking on the ellipsis menu, you can access a menu that provides additional options to perform various actions for that specific customer.


  5. To merge two customers into one, click on 'Merge with another Customer'. A dialogue box will appear where you can select the customer you want to merge from the drop-down menu. So that you know, all invoices connected with the customer chosen in the drop-down menu will be merged into the customer name located on the right.
                                       
  6. Click on the 'Merge' button.

  7. To verify that the merge has been completed successfully, you can just go to the Accounts Receivable section and review the invoices for the merged customer. You will observe that all invoices have now been consolidated under the "merged with" customer.

My Vendor Profile

1. The 'My Vendor Profile' menu allows business owners to edit and update their business vendor profile easily. This enables other users to contact and make payments to them conveniently. Click on the ellipsis menu to edit profile information and address.


Settings

1. To access the settings in the Accounts Receivable module, click on the 'Settings' menu. This will open a new page to find additional options to customize and manage your module settings.


2. To access your Docyt ID, click 'Docyt ID' in the menu. This will open a page where you can view your unique Docyt ID. You can share this ID with your customers, making it easy for them to search for you on Docyt.

3. To access and manage the details of your bank account used for receiving payments, click on 'Bank Account'.

4. Click on 'W-9 Form' to access and update your W-9 Form information. This includes the necessary details for tax purposes.

5. To customize the auto-generation of invoice numbers for all invoices created through an integration, click 'Invoices'.

B. Automatic Validation of UPS Store Franchise Reporting System Integration for Accounts Receivable Data

As part of our continuous efforts to enhance your experience with our platform, Docyt has implemented automatic validation checks for Accounts Receivable (AR) data downloaded from the UPS Store Franchise Reporting System integration.


To understand how it works, let's delve into the process

The UPS Store Franchise Reporting System (FRS) Integration downloads four files: invoices.csv, journal-entries.csv, payments.csv, and credit-memos.csv. These files contain the transaction amounts for each specific date. To maintain accurate data, our system conducts a daily check by calculating the following value:

(Sum of Invoices amount - Sum of Payments amount - Sum of Credit Memos amount) - (Sum of Journal entry amount for the House Account '1110A')

If the calculation result mentioned above is zero, all the Accounts Receivable (AR) data for that day has been accurately downloaded. In this case, the data is marked as 'SUCCESS' in the integration history. However, if the result is not zero, it indicates that some AR data is missing or inaccurate. In such cases, the status for that day is marked as 'INCOMPLETE'.

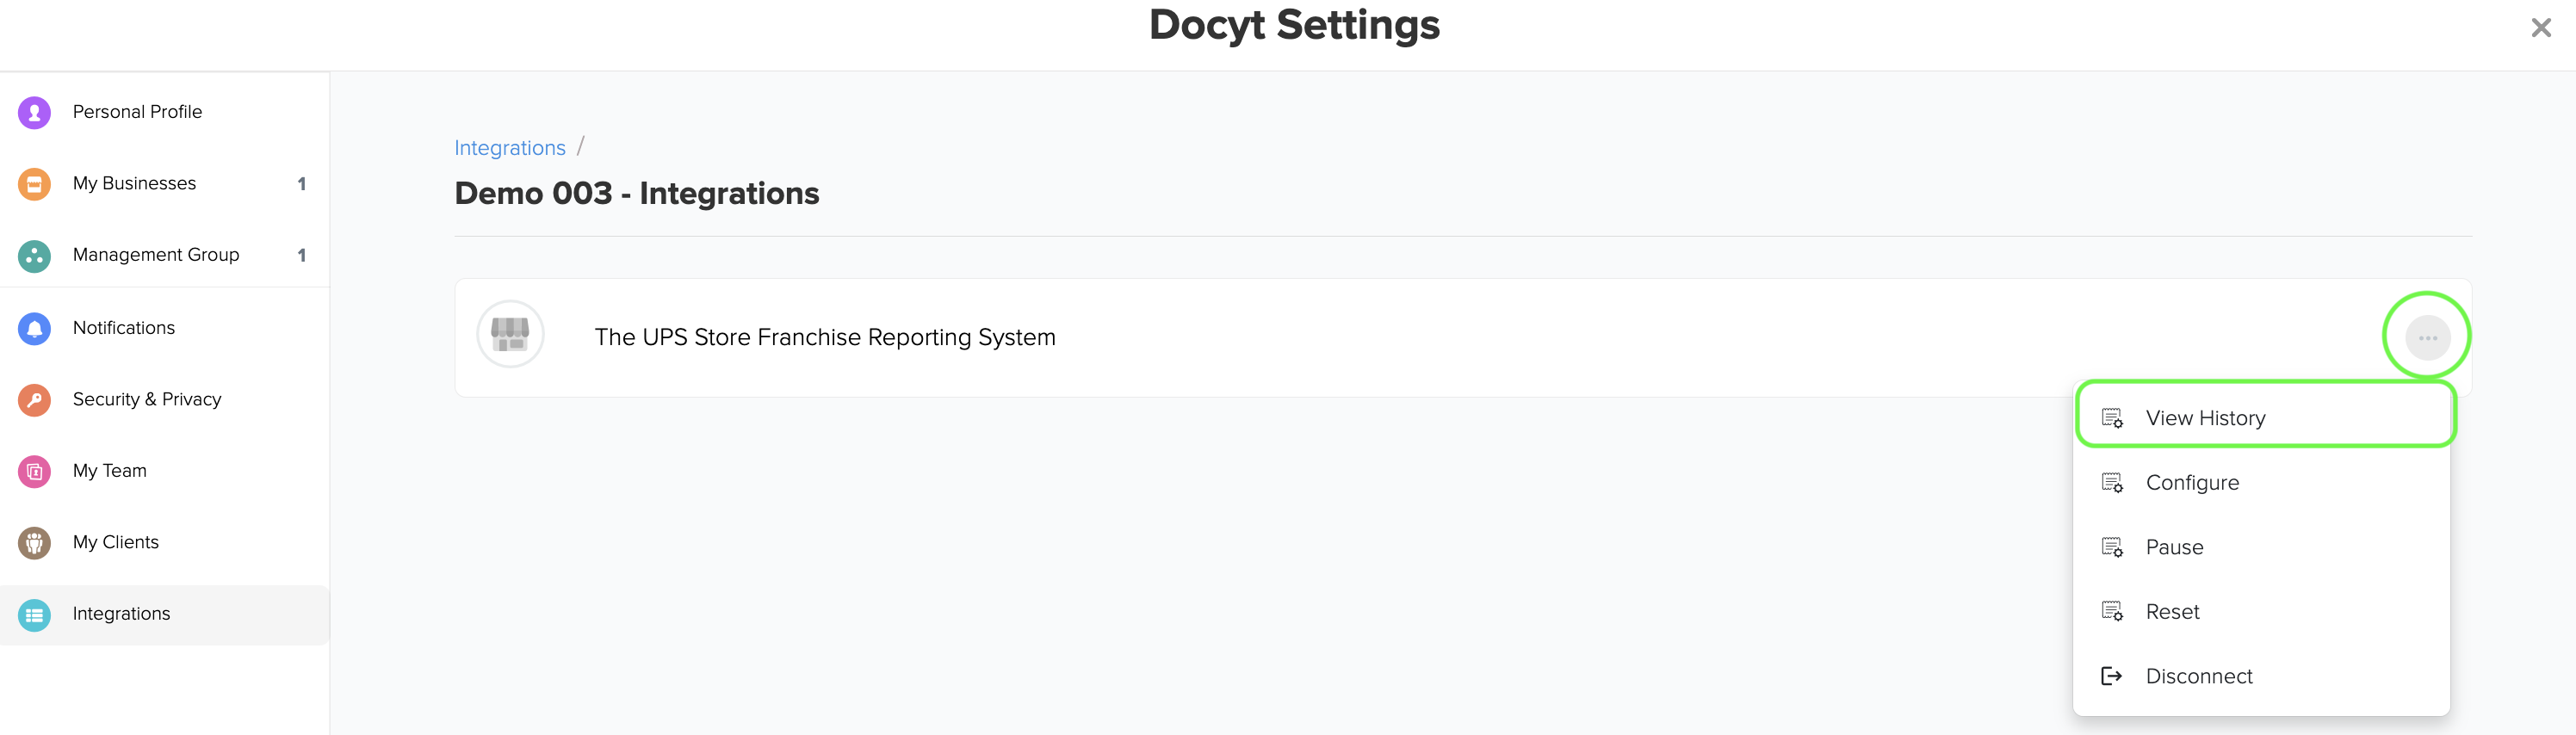
1. go to the Main Settings > Integrations area to manage FRS connectivity. From here, you can check the status of data syncing and reset connectivity if needed. Click on the 'gear icon' in the top right corner and select 'Integrations' from the drop-down menu.


2. Choose your business and click on it.


3. To check the data integration status with UPS FRS, click on the ellipsis menu and choose 'View History'.

4. Choose the month for which you want to view the data. The integration status for each date will be displayed. Click on any date to access the data files for that specific date.

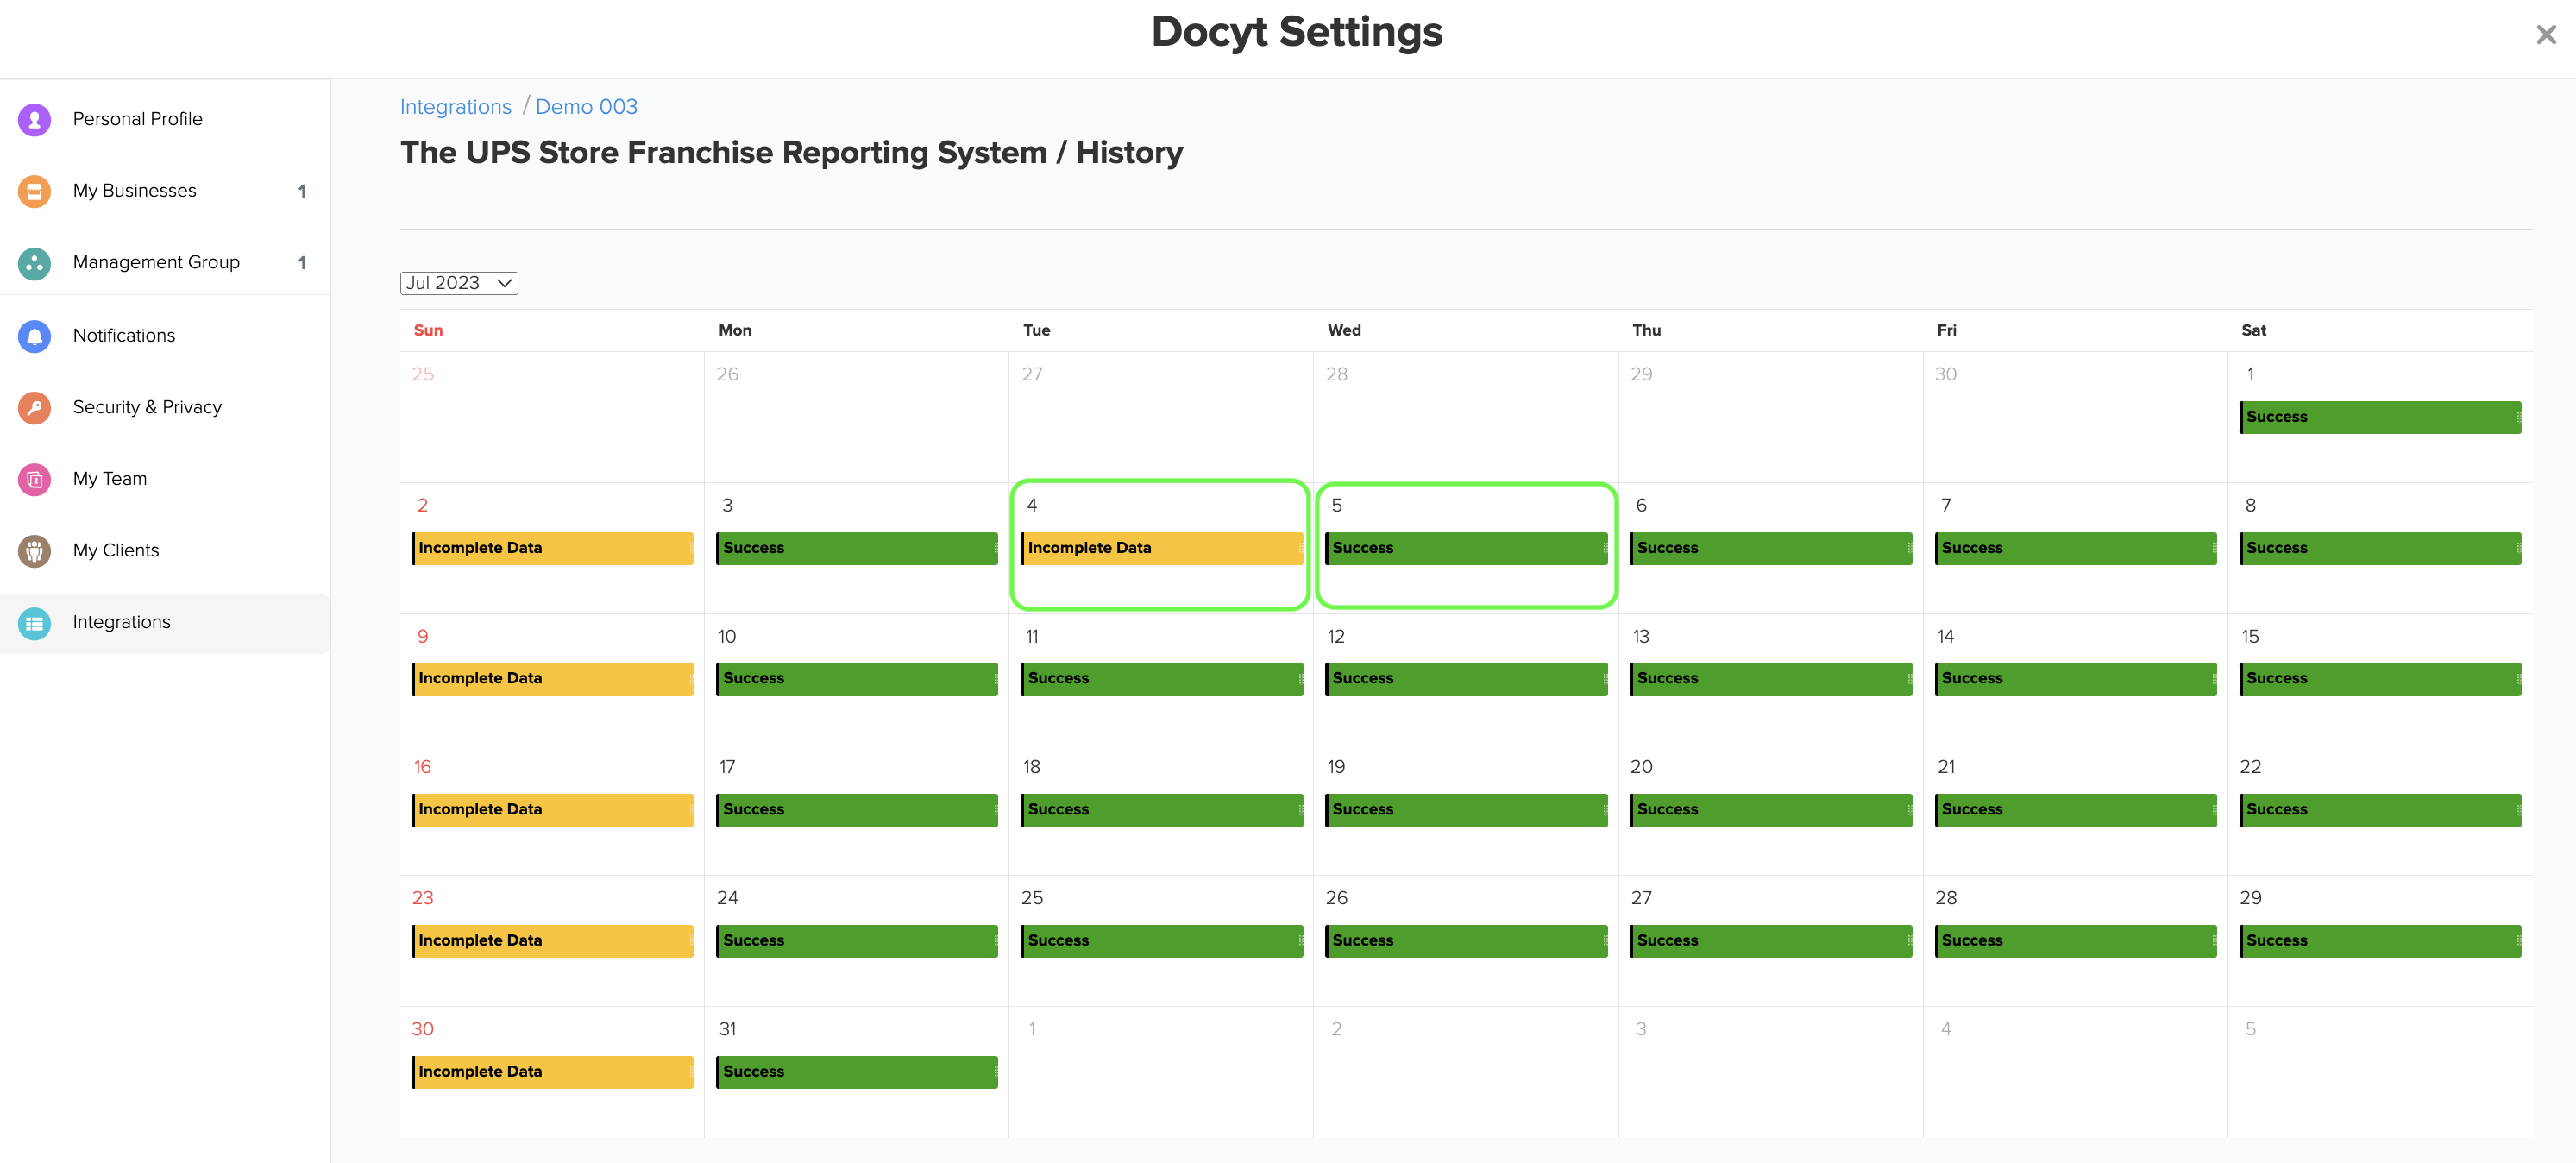
5. The Success message is displayed if:

(Sum of Invoices amount - Sum of Payments amount - Sum of Credit Memos amount) - (Sum of Journal entry amount for the House Account '1110A')=0

To access the data files, click 'Show Files'.


6. You can access a list of CSV files that contain data for a specific date. Click on the files to download them.


What occurs when inconsistencies are identified?

1. If the calculated result is not zero, there are discrepancies in the data for that day. In such cases, the status for that day will be marked as 'INCOMPLETE'. When you hover over the 'i' status icon, an error message will be displayed, stating that the Accounts Receivable balance as of <Date> does not match the balance in the House Account '1110A'.

2. To access the data files containing invoices, payments, credit memos, and journal entries for the house account 1110A, click on the option 'Show Files'.

3. If there is an 'INCOMPLETE' event, no data will be sent to QuickBooks until all the AR data has been received from the UPS FRS integration and the balance matches the House Account (1110A) according to the abovementioned formula. The system will make three attempts to retrieve any missing invoices, payments, or credit memos, and the integration history screen will be updated with the latest status each time.