
Table of Content
B. Chat Section
D. Bulk Actions
F. Additional Actions to Consider
G. How to Mark an Invoice as Paid after Verification
H. How to Flag an Invoice for Client Review/Additional Information
A. Access Unverified Invoices
- To quickly access your unverified invoices in the queue, click on 'Expense Management', 'Accounts Payable', and then on 'Invoice Queue'.

- When you navigate to the 'Invoice Queue' page, it will open up and display all the invoices that require verification. Invoices that have the status of 'In Verification'
 indicate that they require verification. To verify an invoice or bill, click on it.
- Once you open the invoice, you'll notice the 'Data' section on the right side and the invoice in the pdf view itself on the left side. In the 'Data' section, you have the option to review and verify the information extracted by the AI. If you come across any errors or need to make corrections, you can easily update the necessary details.

The 'Data' section includes the following fields:
-
Payee: The payee, or vendor, is the individual or organization that is receiving payment. When entering the payee's name in the invoice, the user should select from Docyt's predefined list of vendors, which is automatically suggested as the user begins typing. If the vendor's name is not on the list, a warning message will appear, and the user will need to add the vendor to Docyt.


-
Amount: This field is where you specify the amount that is due on the invoice.
-
Category: This step is crucial during the verification process as it allows the user to enter the chart of accounts to which the expense is related. Expenses can be categorized into multiple categories for a single invoice, and this categorization will be reflected in the Profit and loss statement.
-
Invoice Date: The invoice date is the date when the invoice is issued, and it is always mentioned in the invoice itself.
-
Accrue: If you need to divide the expense over a specific period, you can utilize this feature to split the invoice accordingly. There are two methods to split the invoice amount:
1. Automatic Schedule: This method splits the amount on a daily basis.
2. Custom Schedule: This will split the amount on a monthly basis.
-
Due Date: The due date of an invoice is the date by which the supplier or vendor should receive the payment for the invoice. In most cases, this date is mentioned in the invoice itself. If the due date is not mentioned, it is typically set as 30 days after the invoice date.
-
Invoice#: The user should enter the invoice number that is provided on the invoice.
-
Account#: If the invoice includes a specific account number, please make sure to enter it in the designated field.
-
Payable address: The payable address on an invoice is where the payment for the invoice should be sent. It is essential to provide the correct address, especially if payment is made by check, as any mistakes can result in the check not being delivered to the vendor and potentially causing conflicts.
-
Memo: This is the section where users can provide any additional information/Merchant name or Merchant field related to a specific invoice.
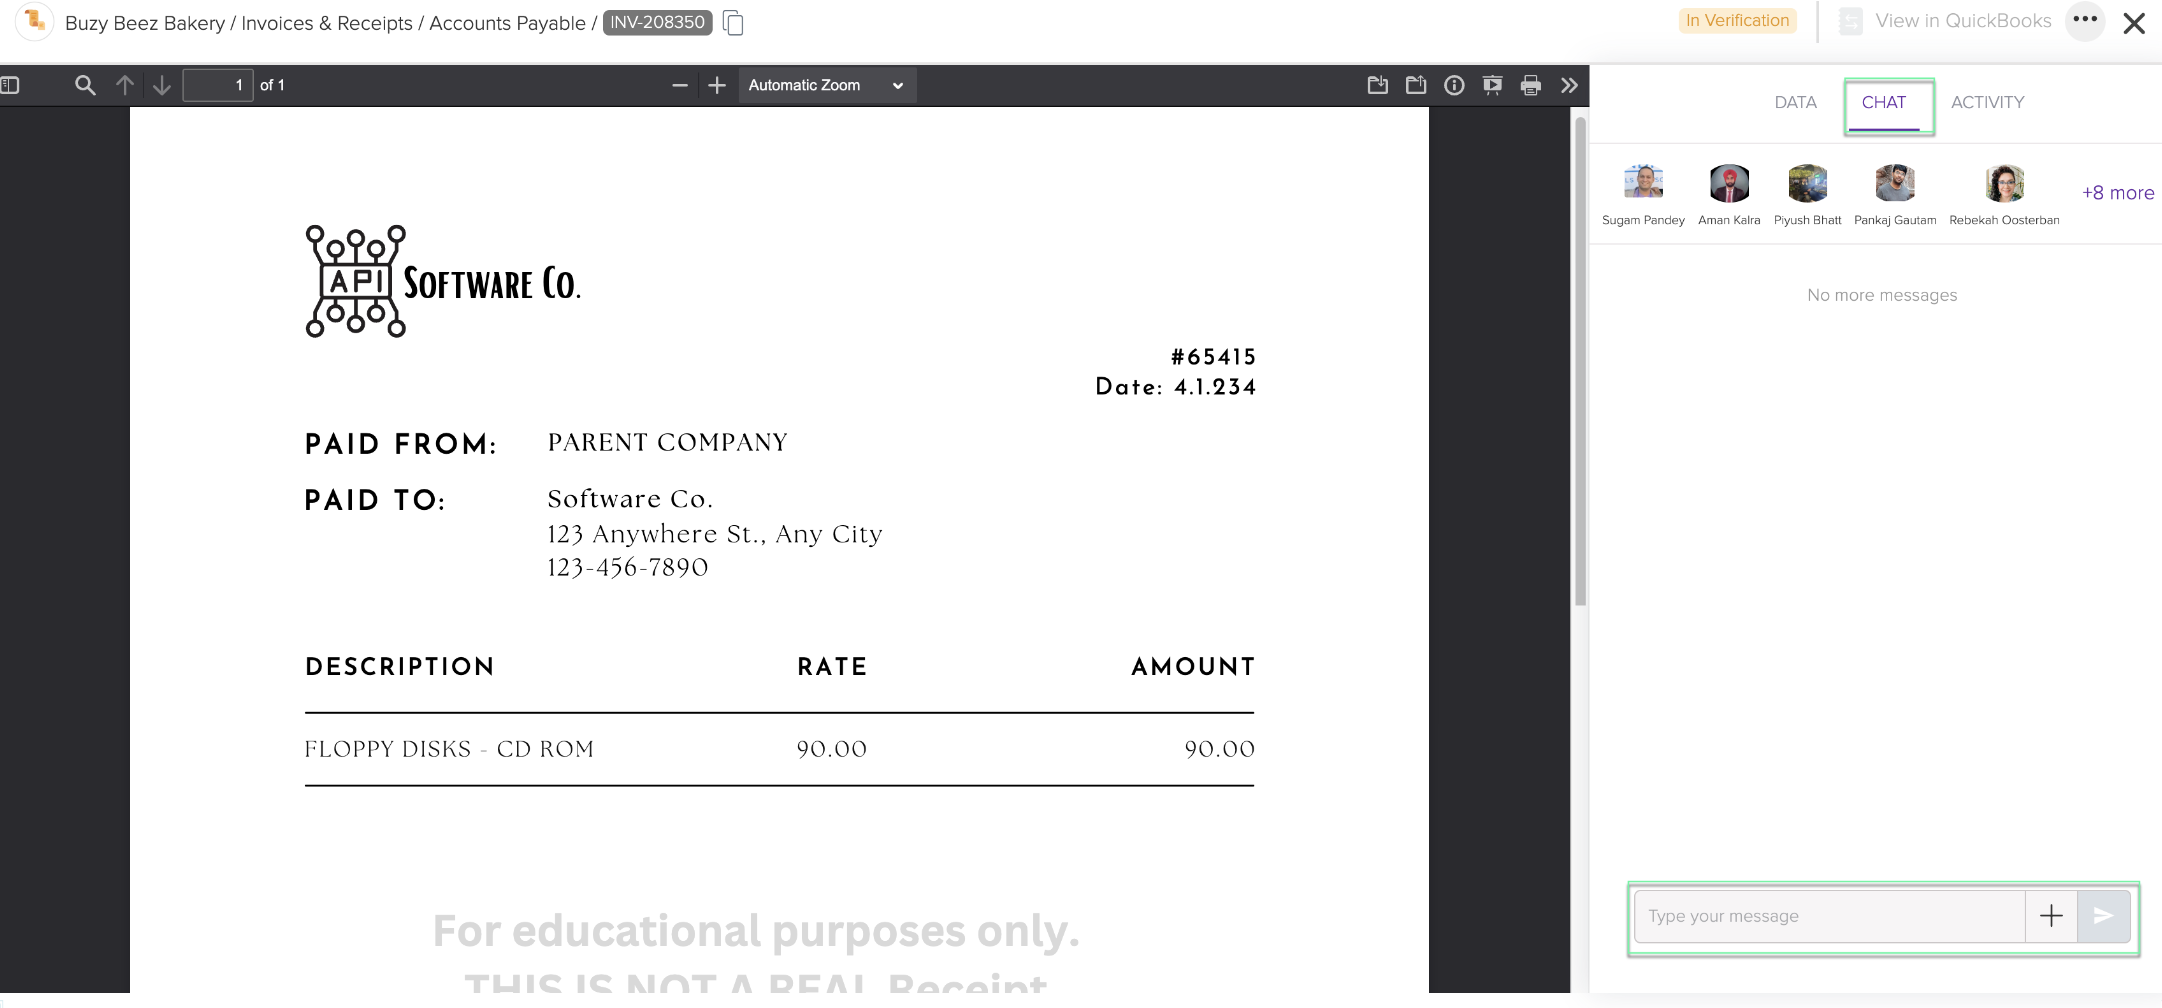
At the bottom of the PDF viewer, you'll see a bar with separate tabs for all documents from the ‘Related Documents’ and ‘Chat’ sections. When you click on a tab, it will open that document in the viewer, and the tab will be highlighted. The first tab will show the invoice and will be selected by default to display the invoice.

From the second tab onwards, the documents from the 'Related documents' and the 'Chat' section will be shown.
Related Documents in the tab
Chat Documents in the tab
-
- If you do not have a user set up as an approver, the invoice will be marked as 'Verified', and you will notice a link labeled 'View in QuickBooks' appear. This signifies that the invoice has been successfully transferred from Docyt to QuickBooks.
- If you have designated a user as an approver, invoices that require approval will be marked as 'Needs Approval'. To see which users can approve the invoice, hover your mouse over the 'Needs Approval' banner on the invoice.

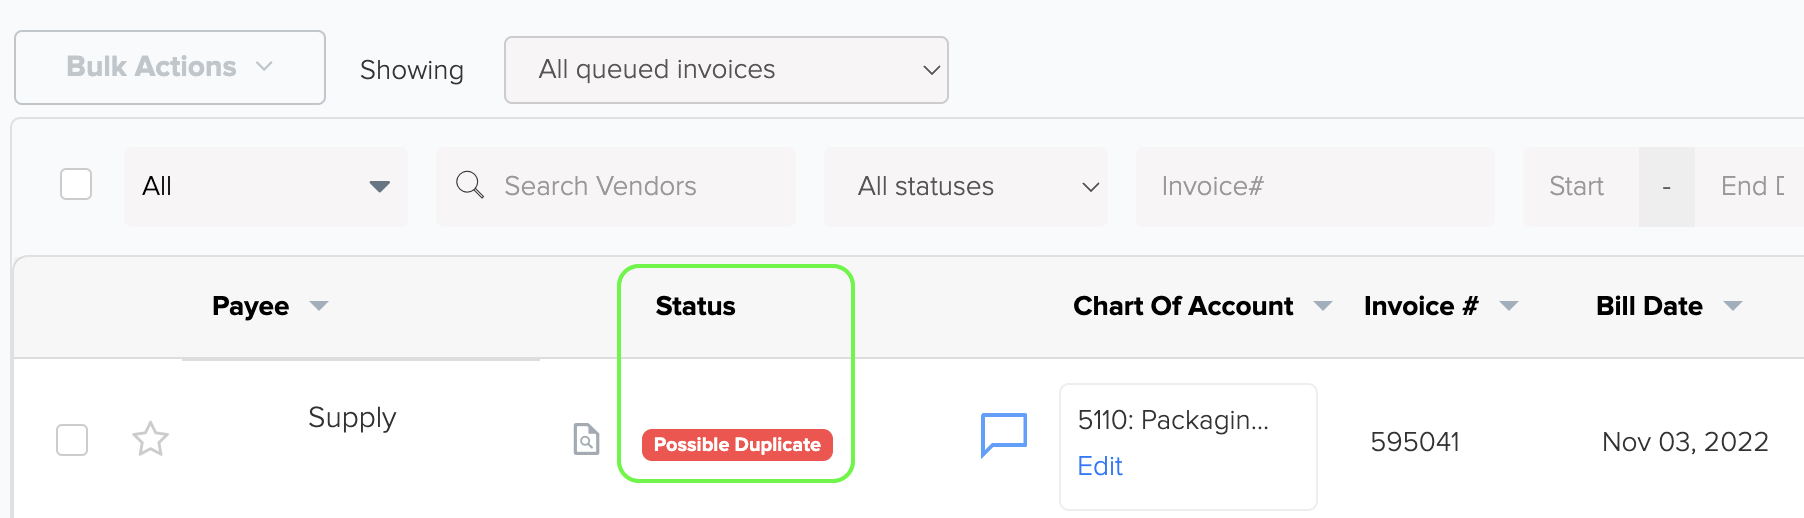
5. Possible Duplicate: Docyt's AI utilizes advanced algorithms to detect potential duplicate invoices. When an invoice is flagged as a 'Possible Duplicate', it means that there is a high likelihood that it is a duplicate of another invoice already in the system. This feature is designed to prevent the unintentional booking of the same expense multiple times. The system recognizes the similarity between invoices and alerts the user to exercise caution when verifying invoices. This helps to maintain accurate financial records and prevent any discrepancies in expense reporting.
B. Chat Section
If you have any questions or concerns while verifying an invoice, you can easily communicate with your team using the chat feature. Mention the person by their username (@username) and provide a clear explanation of your query. An email notification will also be sent to the team member, alerting them about your message. If necessary, you can also attach any relevant documents by clicking the "+" button in the chat box at the bottom. This enables seamless collaboration and ensures efficient communication within your team.
C. Activity Section
The activity section keeps a record of each action you take in the data section. It logs your name and the specific action you performed. This helps to track your activity and maintain a clear record of your actions within the system.

D. Bulk Actions
Bulk Action: When you select multiple invoices by clicking the checkbox, the 'Bulk Actions' button becomes active.

When you click on the 'Bulk Actions' button, you will have access to a variety of menu options. These options allow you to perform multiple actions on the selected invoices all at once, saving you time and effort as follows:
a. Edit Category: This feature allows users to easily edit or change the category for multiple invoices at once.
b. Merge Invoice: This helps the user to merge two or more invoices. However, you can't merge the expense report either with any invoice or any other expense report.
c. Forward: This feature allows users to easily forward invoices to different sections within the same business or to other businesses owned by the same business owner.
d. Verify Invoices: This feature allows users to verify multiple invoices from the same vendor simultaneously.
e. Delete Invoices: Users can delete multiple invoices at once. When invoices are deleted, they are moved to the trash, where they can be retrieved if needed.
E. Filtering Invoice Queue
Users can filter the queued invoices based on the following statuses:
a) All queued invoices: All queued invoices will be shown in this category.
b) Expense report only: Invoices generated due to expense report only will be displayed.
c) Invoices that need my review: Invoices that are in 'In verification' status only will be displayed.

d) Filter: The filtering feature allows users to quickly sort and organize the data based on various criteria such as Starred/ Unstarred (i.e., flagged/not-flagged), Vendor name, Invoice status (All Statuses, Unknown, Processing, In Verification, Duplicates, Needs Approval, Ready to Pay, Ready for Credit), Invoice Number, Start Date, End Date, QB Connection Status (Pushed to Quickbooks, Push to Quickbooks Disabled, Push to QuickBooks Pending, Error), and Amount (Filter by Exact Amount, Filter by Range). This filter can be found right below the bulk actions button, making it convenient to find and access the desired information quickly.

F. Additional Actions to Consider
When you click on the amount button of the verified invoice, a drop-down list of actions will appear.

Learn more about these available options:
-
Send message: This option will take you to the 'Chat Section' of the Accounts Payable mentioned in the paragraphs above. In the Chat Section, you can communicate with your team, ask questions, and provide clear explanations of any queries you may have. It allows for seamless collaboration and efficient communication within your team.
-
Mark as paid: Once the invoice is verified, the next step is to mark it as paid after an invoice is paid. This can be done by multiple methods (Cash, Credit Card, Manual Check, Bank Account, Advanced Settlement, and Vendor Credit) that will be described below in a separate section.

-
Edit Invoice: If the user needs to make changes to a verified invoice, they can do so by clicking on the 'Edit Invoice' button. A warning message will be displayed to confirm the action.

-
View Vendor Profile: By clicking this button, the user will be taken to the 'Vendors' section in Docyt, where they can view the profile of the specific vendor for that invoice on the 'My Vendors' page.
-
Forward: The forward button allows you to quickly move an invoice to different sections within Docyt, including accounts payable, receipt box, business mailroom, and revenue center. You can also forward invoices to other businesses owned by the same business owner.

-
Delete Invoice: You can use this option to delete the invoice. Once deleted, the invoice will be moved to the trash, which can be accessed from the 'Settings' menu in the Accounts Payable module.
Table of Content
G. Marking an Invoice as Paid after Verification and Payment
Marking an invoice as paid updates the system to indicate that the corresponding payment has been successfully recorded. This process helps track outstanding payments, reduces the risk of duplicate payments or overdue invoices, and aids in cash flow management by providing a clear overview of paid and outstanding invoices.
In Docyt, business owners have the authority to make payments. If an invoice or bill has already been paid, you can click on the dropdown menu next to the invoice amount and select the payment method that was used. This will help keep track of paid invoices and provide a clear record of how the payment was made.

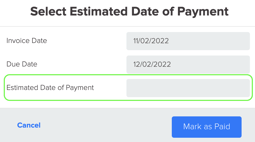
- Cash: If the payment for the invoice is made in cash, you can easily mark it as paid in cash. Click on the 'Cash' option, and a window will appear where you can enter the estimated date of payment. After entering the date, click on the 'Mark as Paid' button to record the payment. This helps keep track of paid invoices and provides a clear record of how the payment was made.
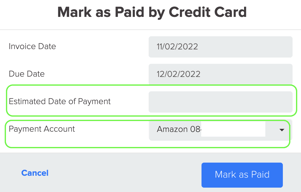
2. Credit card: To mark an invoice as paid using a credit card, indicate the payment date and select the appropriate card from the drop-down list. Then, click on the 'Mark as Paid' button to record the payment.
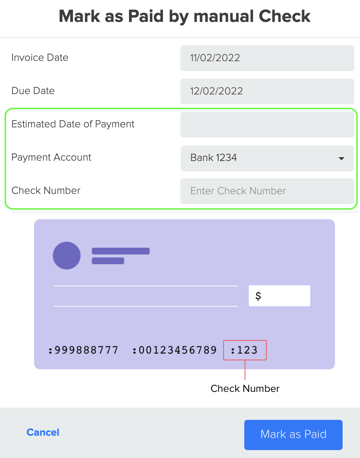
3. Manual check: If payment is made by a manual check, you can choose this option. Once selected, you will need to enter the payment date, bank account information, and the last four digits of the check. This ensures accurate record-keeping and helps track payments made by check.
4. Bank Account (ACH/Debit Card): If you choose to make the payment using a debit card or directly from your bank account, you can select this method.

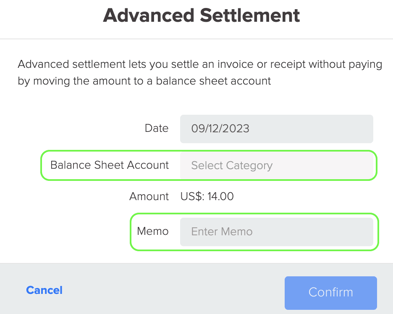
5. Advanced settlement: Advanced Settlement is a feature that allows you to settle an invoice without making a payment in inter-company settlements. Instead, the invoice amount is transferred to a balance sheet liability account. When you choose the 'Advanced Settlement' option, a dialog box will appear. In this dialog box, you need to enter the date (usually set as the last day of the month) and select the Balance Sheet Account (Payable account) of the other business. Then, click on the confirm button to complete the settlement process.
6. Vendor credit: This method is used when an invoice is paid using a credit from the same vendor. It allows for the settlement of an invoice by applying a vendor credit, resulting in the total amount of the invoice being reduced to zero. To utilize this method, select the option for vendor credit to create a bill payment of $0.
H. How to Flag an Invoice for Client Review/ Additional Information
1. To mark an invoice for client review, navigate to the 'Invoice Queue' in the Accounts Payable module. Locate the invoice you want to flag and click on the 'Star' icon at the beginning of the invoice row. Alongside the star icon, you will find a chat icon. Here, the Account Manager can ask the client any questions or request additional information. When the Account Manager clicks on the star icon, it changes color to yellow, indicating that the invoice has been flagged.

2. The flagged invoice will then appear in the 'Review Open Items' dashboard of the client.
