- Help Center
- Docyt Setup, Personal & Business Settings
- Accountant/CPA Access
-
Docyt Setup, Personal & Business Settings
-
Navigation & Getting Started
-
Top FAQs from Business Owners
-
Docyt Mobile App
-
Accounts Payable
- Setup
- Managing and Processing Invoices
- The UPS Store®
- Document Management
- Vendor Credits
- Accounts Payable Approval Settings
- Bill Pay
- Docyt Full Service Check
- Docyt ACH
- Split Expenses
- Intercompany Settlement
- Vendors & Payees
- W-9 & 1099
- Invoice Queue
- Check Register
- Mark As Paid
- Payment Rules
- Receipt Box
- Copy Invoice Link
- Billable Invoice
- Merge Duplicate Vendors
- Docyt Check
- Split Invoice in Multiple Payments
- split statement to invoice
- Split Invoice In Multiple Businesses
- Split Invoices
- Vendor Tax Profile
-
Flagged Transactions & Document Requests
-
Financial Connections
-
Expense Reports & Employee Reimbursement
-
Receipt Management
-
Business Reports & Budgets
-
Vendors, Payees, W-9 & 1099
-
Revenue Integration & Reconciliation
-
Reconciliation Center
-
Accounts Receivable for The UPS Store®
-
Business Mailroom
-
Accountant
-
Product Updates
-
Docyt University
-
iOS
-
Ledger Reports
-
Revenue Centre
-
Integration
-
Docyt Plans
-
Vendor Payment Report
-
Docyt Check
-
Account Receivables
-
Expense Management
-
Connect Quickbooks
-
Docyt Copilot
-
Bulk Payments
-
Business KPI-Mobile
How do I provide view-only access to Bluevine Financial Institution for accountants?
The need for this feature arises from the requirement to view or download monthly statements to reconcile the accounting books. This functionality saves clients valuable time by eliminating the need to send the statements every month manually.
To grant accountant view-only access to the Bluevine financial institution, you need to follow these steps:
STEPS :
To provide access to Additional Users, the Administrator can navigate to the Profile & Settings section in their Bluevine Dashboard. Follow these steps to add an Accountant role:
-
Log in to your Bluevine Dashboard.
-
Click on the Settings icon located in the top right-hand corner.
-
Navigate to the Account Access tab.
-
Click on the Invite user button.

-
Fulfill the Multi Factor Requirement.
-
Choose a user from the list or select + New user
-
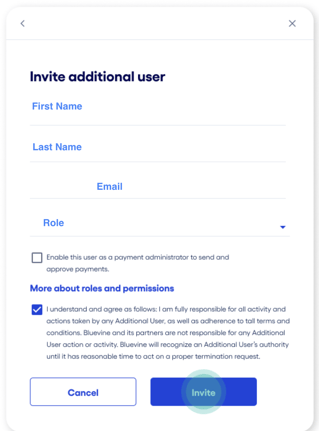
Provide the first and last name of the additional user, as well as their email address.
Note: If there is a beneficiary owner associated with your account, you will be able to find their name listed among the users you can choose from.
-
Choose the role you want to assign to the additional user from the dropdown menu labeled "Role".
-
If you choose the Accountant role, you will be asked to confirm whether the added user is an external accountant or bookkeeper. If they are, they will be invited to sign up for the Accountant Dashboard. Accountant Dashboard.
-
-
Click on the Invite button to send the invitation.

11. After accepting the invitation, the additional user will be prompted to agree to Bluevine's registration terms and privacy policy. They will then create a password for signing in and provide their date of birth. The email used for signing in will be the same email entered in Step 7.
Note: If the Additional User is already registered with Bluevine for another company, they will receive an email notification informing them that they have been added as an Additional User to a new business. When they log in, they will have the option to choose between the different companies they are registered with. This allows for easy navigation and access to the relevant business information. For more details on how to sign in and navigate between multiple companies, please refer to the section on Multi Company Sign In and Navigation below.
12. The additional user will now be granted account access based on the role type you selected in Step 8.
Note: To learn more about accessing and managing permissions for the Bluevine financial institution, you can visit the Bluevine webpage by following the provided link.: How do I manage my Additional Users.