- Help Center
- Accountant
- Setup & Configuration
-
Docyt Setup, Personal & Business Settings
-
Navigation & Getting Started
-
Top FAQs from Business Owners
-
Docyt Mobile App
-
Accounts Payable
- Setup
- Managing and Processing Invoices
- The UPS Store®
- Document Management
- Vendor Credits
- Accounts Payable Approval Settings
- Bill Pay
- Docyt Full Service Check
- Docyt ACH
- Split Expenses
- Intercompany Settlement
- Vendors & Payees
- W-9 & 1099
- Invoice Queue
- Check Register
- Mark As Paid
- Payment Rules
- Receipt Box
-
Flagged Transactions & Document Requests
-
Financial Connections
-
Split Expenses, Accrue Expenses & Intercompany Settlement
-
Expense Reports & Employee Reimbursement
-
Receipt Management
-
Business Reports & Budgets
-
Vendors, Payees, W-9 & 1099
-
Revenue Integration & Reconciliation
-
Reconciliation Center
-
Accounts Receivable for The UPS Store®
-
Business Mailroom
-
Accountant
-
Product Updates
-
Docyt University
-
iOS
-
Ledger Reports
-
Revenue Centre
-
Integration
-
Docyt Plans
-
Vendor Payment Report
-
Docyt Check
-
Account Receivables
How to Back Up Company Files Manually on QuickBooks Desktop
If you prefer, you can back up your company files yourself anytime.
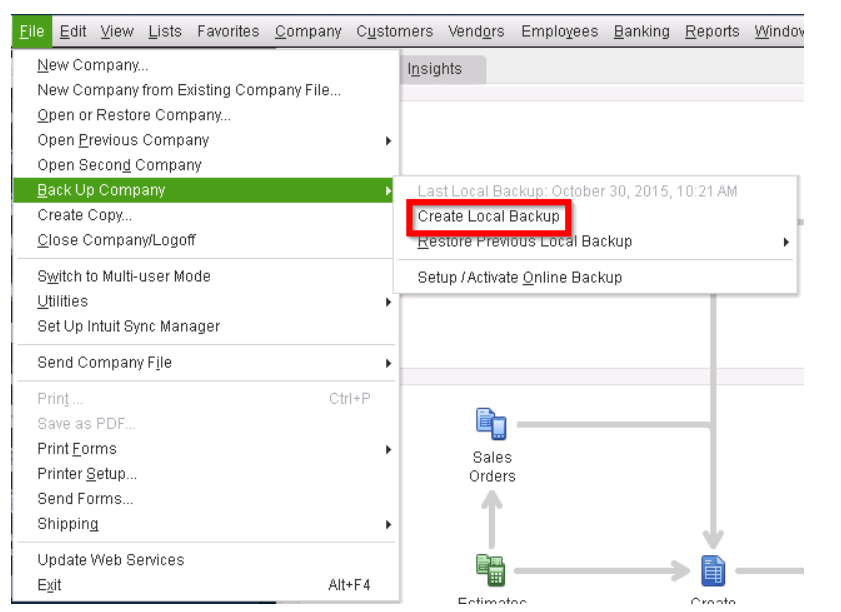
- Go to the File menu and hover over Back Up Company. Then select Create Local Backup.
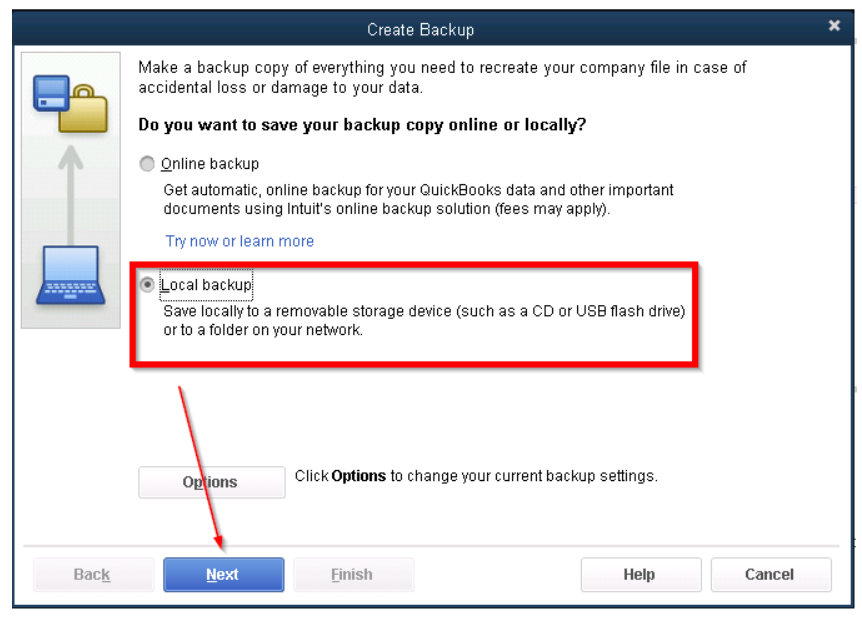
- In the window, select Local backup and then Next.
- In the Local Backup Only section, select Browse and choose where you want to save your backup company file.
- Set the number of backups you want to keep. This is optional.
- This tests to ensure your backup file is in good shape before you save.
- When you're ready, select OK.
- Select 'Save it now' and Next.
QuickBooks creates a single backup company file. When it's done, you get a confirmation message.
How to create a portable company file on QuickBooks Desktop
-
Open QuickBooks and log in.
-
Go to the File menu and select Create Copy.
-
Select Portable company file and then Next.
-
Give your portable company file a unique name.
-
Select a location to save your portable company file.
-
When you're ready, select Save and then OK.