Financial Account Configuration in Docyt
Guide to Setting Up, Connecting, and Automatic Mapping Bank Account
NOTE - Please create and select a management group before completing the following steps.
- Setting Up a Bank Account in Docyt
- Connecting Financial Account To Docyt
- Mapping the Automatic Connection
Setting Up a Bank Account in Docyt
- Click on the 'Settings' menu.

-
Navigate to 'Financial Accounts', located on the left side of the settings screen.

-
Click the blue plus (+) icon in the upper right corner.

-
Add a new account. A new screen titled 'Add New Account' will appear on the right side.
-
Select the' Add Bank Account Manually' option if you are adding a bank account, such as a checking account, money market, or other type of bank account.

-
-
Input the account name. We recommend using the format: Bank Initials - last four digits of the account number (e.g., BofA - 1234).

-
In the 'Last 4 Digits' field, provide the last four digits of your account number.

-
Leave the 'Routing Number' field empty (Optional).

-
Select the blue 'Edit' option under the 'Chart of Accounts' field.

-
If you've already set up a chart of accounts for your financial account, please go to step 10.
-
If you still need to set up a chart of accounts for your financial account, choose 'Link As New Account'.

-
Since you're adding a Bank Account, the category type should be 'Bank'.

-
Determine the type of bank account using the 'Detail Type'. For instance, select 'Checking' if it's a checking account.

-
Specify the category name, which will be the name of the chart of accounts associated with the bank account you're adding to Docyt.

-
Confirm your selections by clicking the blue 'Done' button.

-
-
Select your account from the chart of accounts list by checking the box.

-
Click 'Done'.

-
Please finish the setup by clicking the 'Done' button at the bottom of the 'Add New Account' screen.

Connecting Financial Account To Docyt
-
Click on the gear icon at the top of your screen.

-
From the dropdown menu, choose 'Financial Connections'.

-
Select the name of your business from the list. Ensure the selected business is the one you're adding to the financial connection.

-
Click the blue '+ Connect' button in the top right corner.

-
Select 'Connect to a New Financial Institution'. (If you have already connected the financial institution -- you can skip to Mapping the Automatic Connection.)

-
Choose the Management Grous created during setup, then click 'Continue'.

-
A pop-up window will appear, stating that Docyt uses Plaid for a secure, continuous bank connection. Click 'Continue'.

-
You can enter your bank's name into the designated field and then click on the bank name to confirm your choice.

-
You can just follow the onscreen prompts to validate your financial accounts securely.
-
Close the 'Financial Connections' window by clicking the 'X' in the top right corner.
-
Repeat steps 4 through 10 until all your financial accounts are connected.
-
Close the 'Financial Connections' window by clicking the 'X' in the top right corner.

Mapping the Automatic Connection
-
Go to 'Banking & Reconciliation' from the top menu, and choose 'Banking Accounts' and 'Accounts'.

-
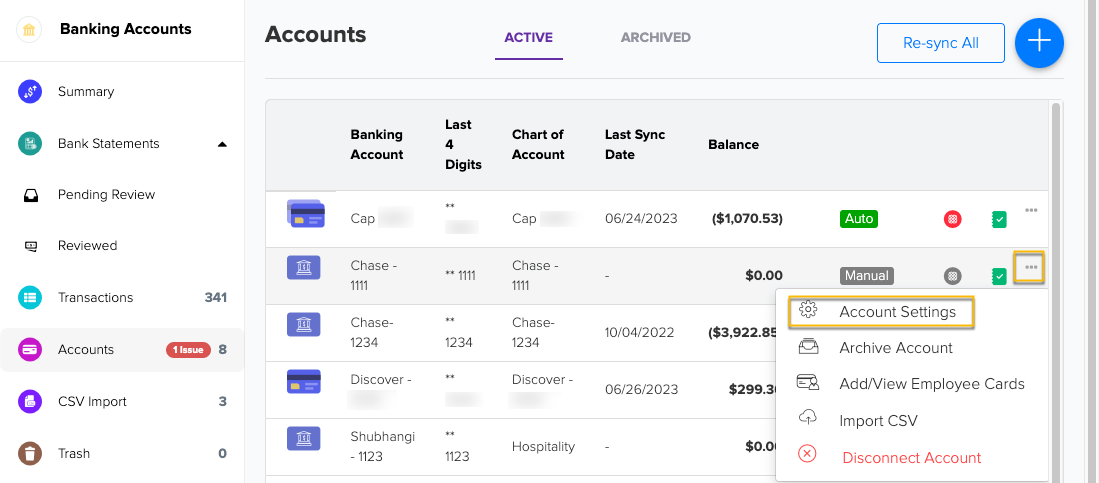
Find the account you wish to map to the financial connection you created.
-
Click on the three-dot menu on the right side of the screen and choose 'Account Settings'.

-
In the 'Transaction Import' field, select 'Automatic'.

-
Click 'Select an account' under the 'Mapped Financial Institution Account' field.

-
Choose an account from the available financial institution accounts.
-
Map the financial connection to the account by clicking on it.

-
You can confirm your mapping by clicking the blue 'Done' button at the bottom of the 'Account Settings' window.
