
Table of Contents
- Docyt AI Description
- Toggle On/Off
- Settings
- Do not auto-categorize
- No Document Needed
- Do not push to Ledger
Docyt AI Description Feature
Key Features of Docyt AI:
1. The AI prediction banner can predict transaction notes based on the description of the transaction, providing intelligent suggestions for unflagged transactions. This reduces the manual effort needed for these transactions and increases the efficiency of processing.

2. By offering predictive suggestions and autofill options based on past data (from Docyt’s system), the system reduces the likelihood of errors in data entry, ensuring higher accuracy in transaction processing.
3. Docyt AI Experience provide complete transaction notes, such as missing vendor names, categories, or other relevant details, which leads to incomplete or inconsistent data.

Toggle On/Off
- Turning On the Docyt AI will learn/fetch the data from the transaction attributes.

- Turning Off the Docyt AI will prevent it from learning or retrieving data from transaction attributes.

You can also access the Docyt AI Setting from here, which will take you to the Docyt AI configuration page, where you can turn on or off the autopilot settings.

Configuration
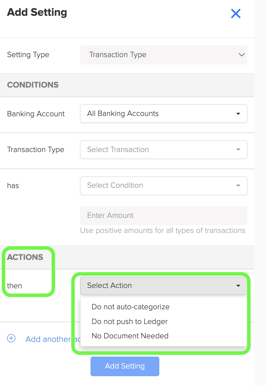
- To configure Auto-Pilot Settings, click the "Add an Auto Pilot setting" link in the Auto Pilot Settings section.

- This opens up a section on the right side where you can set conditions and predefine actions based on those conditions.

- There are two types of settings for conditions in Docyt: Transaction Type and Vendor Type.

- Select the setting type from the drop-down list. The available condition types will vary depending on whether you choose the Transaction or Vendor type. For visual references, please refer to the screenshots provided below.
 .
. 
6. In the transaction type section, you can choose from various transaction types in the drop-down list.

7. When the transaction type is 'Income', an additional condition called 'Payment Processor' is displayed.

8. In the Vendor Type section, you can choose the vendors that are associated with your business from the drop-down list. This feature allows you to customize actions for specific vendors involved in the transaction easily. You can choose not to auto-categorize, not push to the ledger, or not require any documents for these vendors.

9. In Auto-Pilot settings, you have four options for the 'has' condition: Amount less than, Amount equal to, Amount greater than, and any transactions.

- 10. Choose the action you want to take from the three available options: 'Do not auto-categorize', 'Do not push to Ledger', and 'No Document Needed'.
Examples
- Enable Do not push to Ledger for payroll transactions (another payroll system may already be pushing payroll transactions to the ledger).
- Enable No Document Needed for expense transactions less than $50.00 (As per business policy, if applicable). For example, an employee isn’t expected to send receipts for expenses under $50.00 from Amazon.com.
- Do not auto-categorize deposit transactions over $50,000.00 (high-dollar transactions may be investments in the business and may need in-depth consideration).
- For vendors with recurring monthly charges, set No Document Needed to streamline processing for expected charges (As per business policy).
- As you are manually verifying a transaction, you can enable Do not learn on this specific transaction (as per business policy). Auto-pilot will not learn its categorization.
- Under the conditions area, you can create an Auto Pilot setting for a specific Banking Account (also referred to as Payment Method).
Do not auto-categorize
The 'Do not auto-categorize' setting allows you to establish specific transaction amount limits that align with your business requirements.
- For instance, if a business wants to review income transactions exceeding $5,000 carefully, it would need to enable the 'do not auto-categorize' setting. In this scenario, any transactions over $5,000 will remain in the Uncategorized Transaction area, allowing for manual verification. Please refer to the screenshot below for step-by-step instructions on setting this up.

No Document Needed
No Document Needed is used when the business knows it won’t need documentation for specific events.
- For instance, if your business has recurring vendor charges that are billed at the same amount every month, you can easily set up the Auto Pilot feature to handle these transactions. Add the vendor, enter the exact amount charged, and then select 'No Document Needed' as the action. This is particularly useful when you know there won't be an associated receipt for these recurring monthly service fees. Take a look at the screenshot below for step-by-step instructions on how to set this up.

Do not push to Ledger
Do not push to the Ledger prevents specific transaction types, like payroll charges, from being automatically pushed to the ledger.
- For instance, if you use a popular payroll service like ADP that integrates with QuickBooks, enabling the 'Do not push to Ledger' setting in Docyt is important. This is because, without this setting, Docyt may inadvertently push payroll charges to the ledger, resulting in duplicate entries if another payroll system is also in use.

WARNING: Do not enable this setting if the business requires Docyt to push payroll transactions to the ledger.