Guide to Accounts Payable Management in Docyt
Table of Content
Single Administrator Small Business Setup
Small business with one invoice payer and multiple invoice uploader
Small business with two business employees responsible for managing accounts payables
Medium-sized business with an accounts payable department
Docyt offers the flexibility to assign different roles to different individuals, allowing you to customize the Accounts Payable module according to your business process needs. This article provides helpful suggestions and best practices based on your specific business workflow.
Small business that has only one business administrator responsible for managing accounts payable
In this scenario, the small business designates one person, usually the business owner, to handle all tasks related to accounts payable. This individual takes on the role of the Payer in the Accounts Payable module, which grants them the ability to upload, edit, verify, and pay invoices using Docyt Check/ACH. Since there is only one person responsible for managing accounts payable, there is no need for an Approver in this specific situation.
Small business with one invoice payer and multiple invoice uploader
If the business has a few individuals involved in uploading invoices into Docyt, the user roles can be set up as follows:
- Business Owner is assigned the role of Payer in Docyt, which grants them the ability to upload, edit, verify, and pay invoices using Docyt Check/ACH.
- The data entry users are assigned the role of Uploader in Docyt, which enables them to upload and edit invoices.
Small business with two business employees responsible for managing accounts payables
In this scenario, user roles in Docyt Accounts Payable can be set up as follows:
- One user is assigned the role of Approver, which enable them to handle Upload, Edit, Verify, and Approve invoices. For example Office Manager can be assigned the role of approver.
- Other user is assigned the role of Payer, which enable them to handle Upload, Edit, Verify, and Pay invoices. However, Payer cannot pay the invoice until its approved by Approver. Typically, the person who is authorized to sign checks is assigned the role of Payer in Docyt. This means they have the authority to make payments once the invoices have been approved.
Medium-sized business with an accounts payable department
In medium-sized businesses, the management of Accounts Payables may be handled by an Accounts Payable Department or outsourced to a CPA firm. The process of uploading, approving, and paying invoices is divided among multiple individuals, with each person responsible for a specific part of the overall process. This ensures that the workload is distributed efficiently and enables each individual to focus on their assigned tasks.
In this situation, you can set up user roles in Docyt as follows:
- The person responsible for data entry, such as an Accounts Payable Clerk, is assigned the role of Uploader in Docyt. This role allows them to upload and edit invoices efficiently.
- Each department head, such as a Marketing Director or an Office Manager, is assigned the role of Approver in Docyt. As Approvers, they have the ability to review and approve individual invoices that are assigned to their department's budget for payment.
Managing the Approval of Invoices in Docyt as an Approver
- Once an invoice has been verified, it moves into the approval step in Docyt. The status of invoice shows 'Needs Approval' message to the users who have 'Approver' role.

- If a business has multiple approvers for invoices, you will see the names of all the approvers when you hover over the 'Needs Approval' status.

- To adjust the Account Payable settings and determine whether approval is required from all approvers or just one of them, simply click on the 'Settings' option.

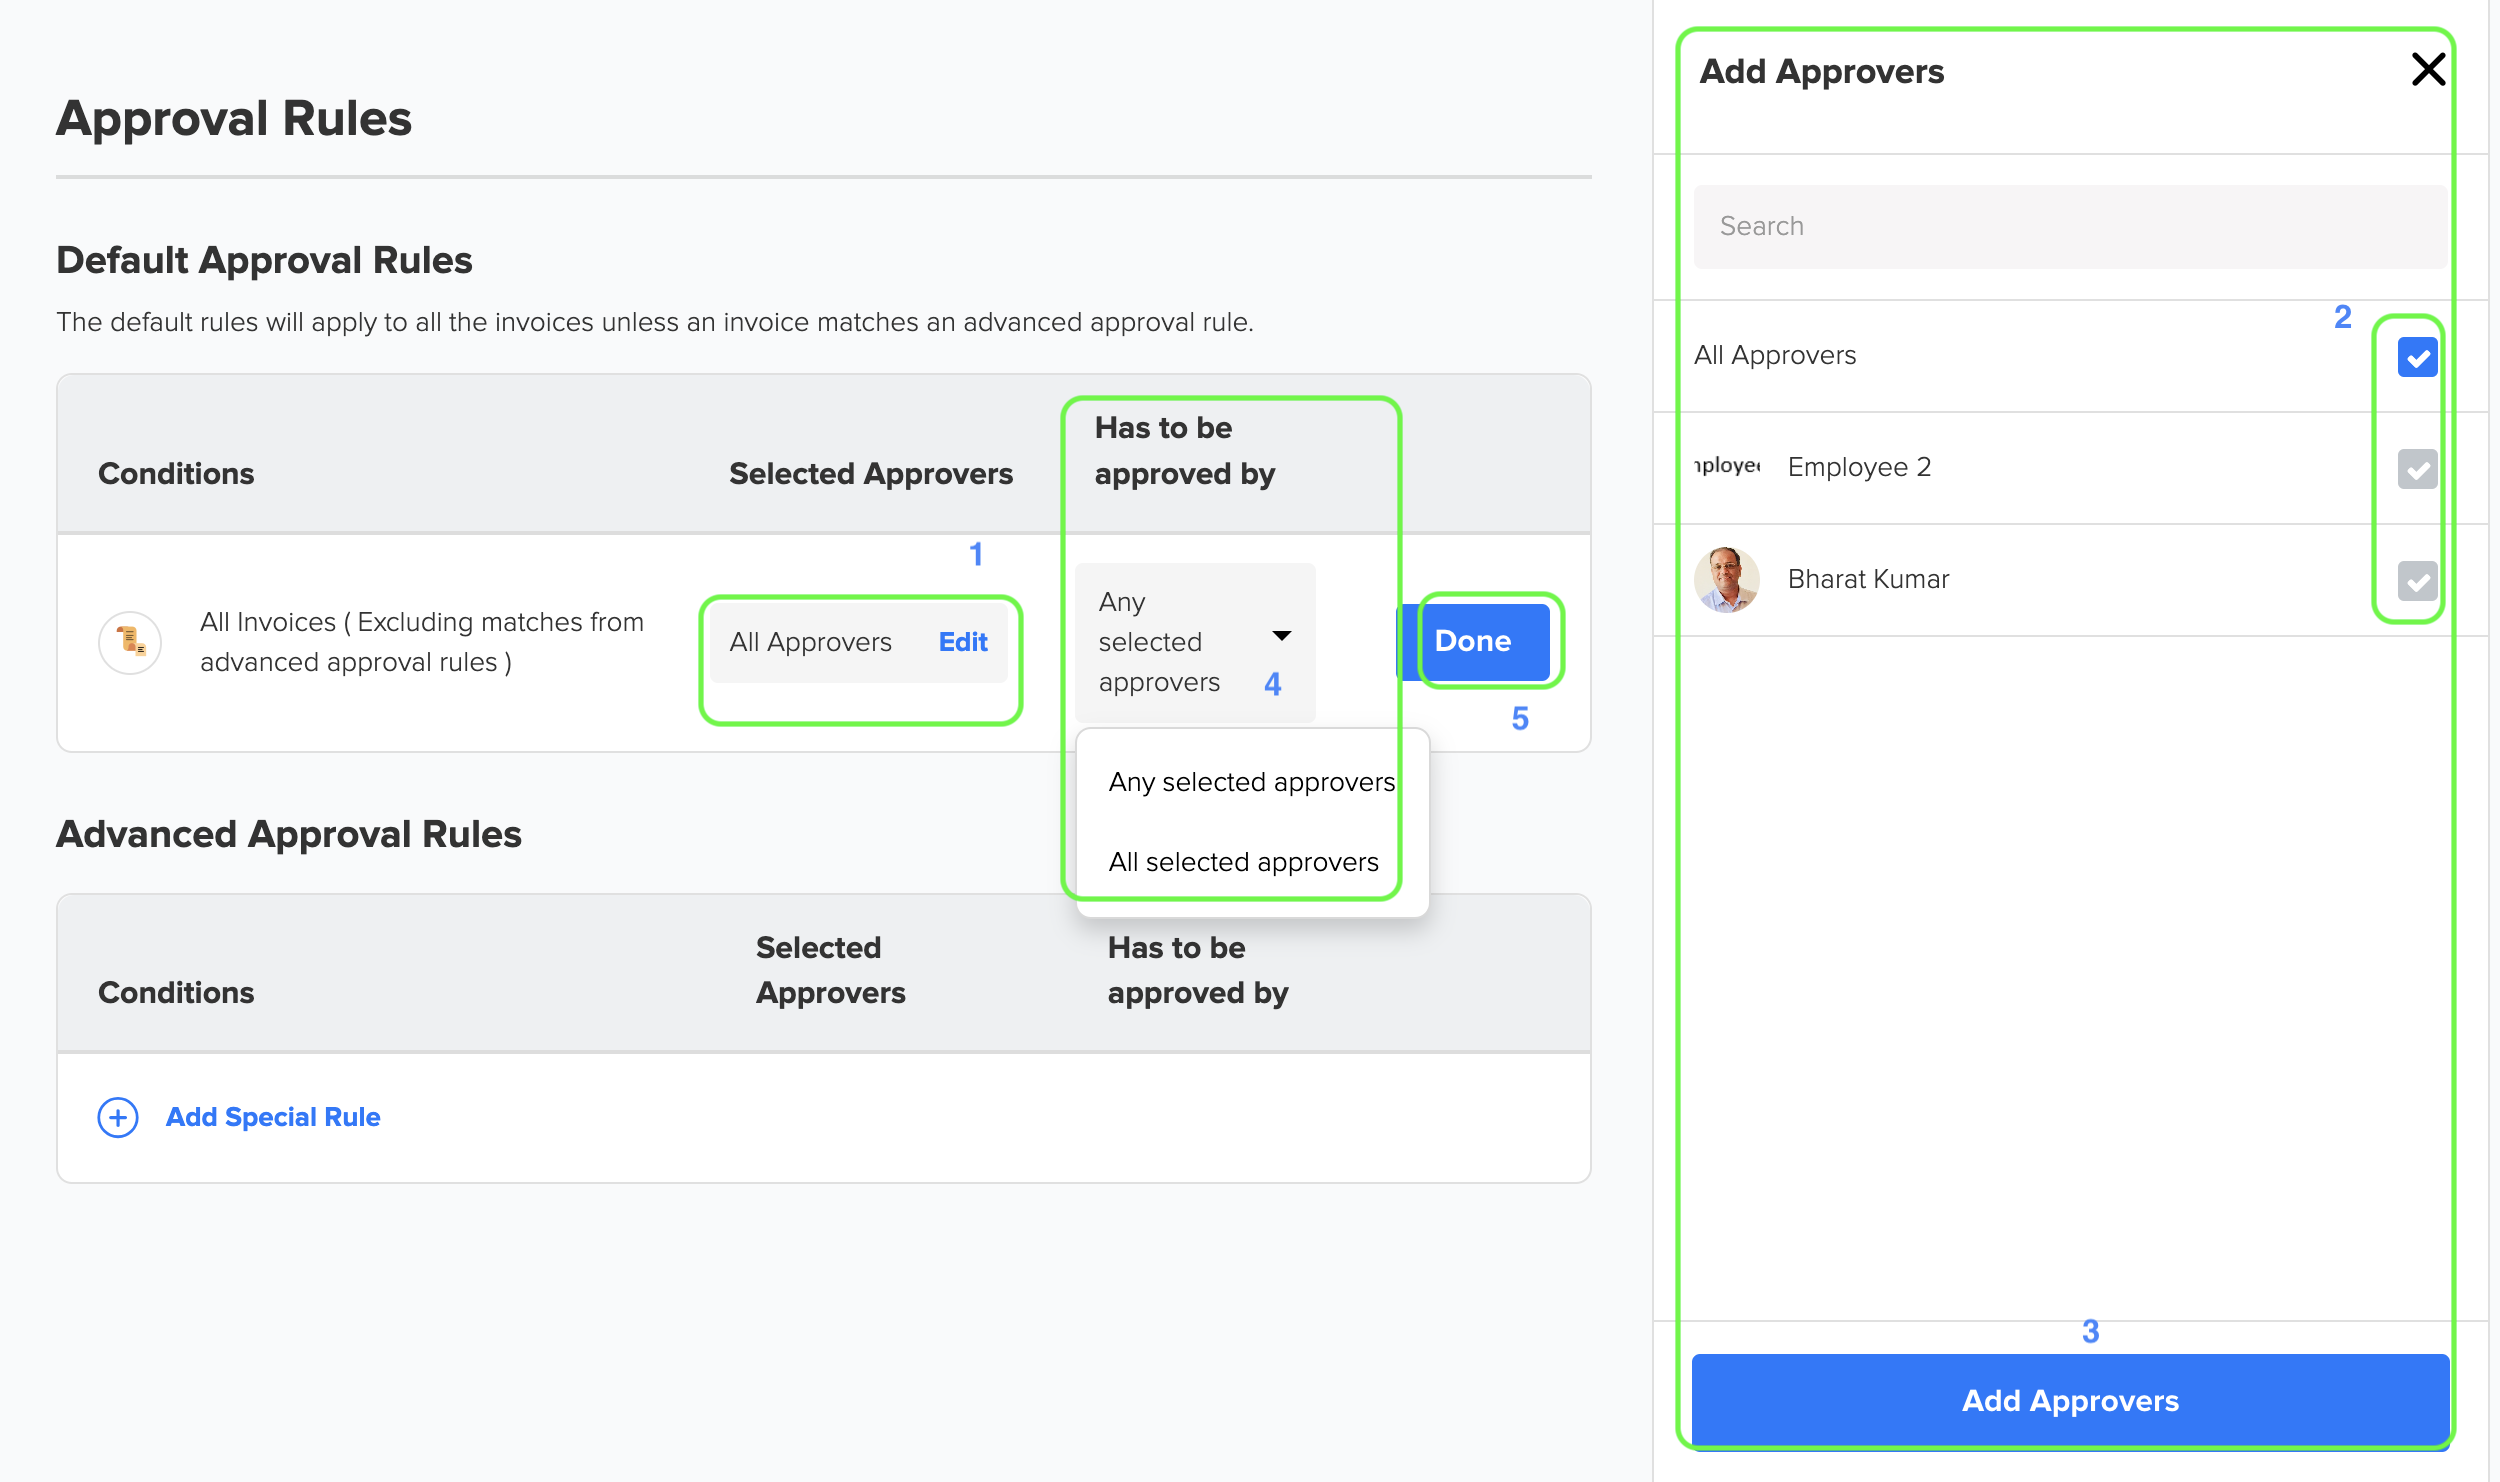
- To access the 'Approval Rules' setting page, simply click on it. This page is divided into two sections: Default Approval Rules and Advanced Approval Rules. The default rules are automatically applied to all invoices, except for those that meet the criteria of an advanced approval rule. In the 'Advanced Approval Rules' section, you have the option to specify conditions such as 'Vendor Name' and 'Transaction Amount', as well as the approvers for those conditions. For example, you can set a specific transaction amount and require approval from a particular approver for invoices that exceed that amount. To edit the Default Approval Rules, click on the ellipsis menu and select 'Edit Rules'.

- In the image below, click on the 'Edit' button to choose the Approvers from the list provided in the 'Add Approvers' section on the right side. Simply check-mark the checkbox next to the desired 'Approvers'. Then, click the blue 'Add Approvers' button. In the 'Has to be approved by' column, select the conditions from the drop-down list. Finally, click the 'Done' button to save all the settings.

- To set up Advanced Approval Rules, simply click on the 'Add Special Rule' link.

- This feature allows you to edit the 'Conditions', 'Selected Approvers', and 'Has to be approved by' columns. You can set the other two columns in the same way as shown in step 5 above. Simply click on 'Add Condition' to add a new condition.

- Choose 'Vendor' to specify the name of a specific vendor for which an approval rule needs to be defined. Alternatively, select 'Transaction Amount' to establish a condition based on the transaction amount of the invoice.


- Approvers have the ability to quickly and efficiently "Verify and Approve" invoices that are currently in the "In Verification" status. To do this, simply click on the invoice amount and select "Verify and Approve" from the drop-down list. This streamlined process allows for seamless approval of invoices with just one simple step.

- To verify and approve an invoice in one simple step, click on the blue button labeled 'Verify and Approve'.

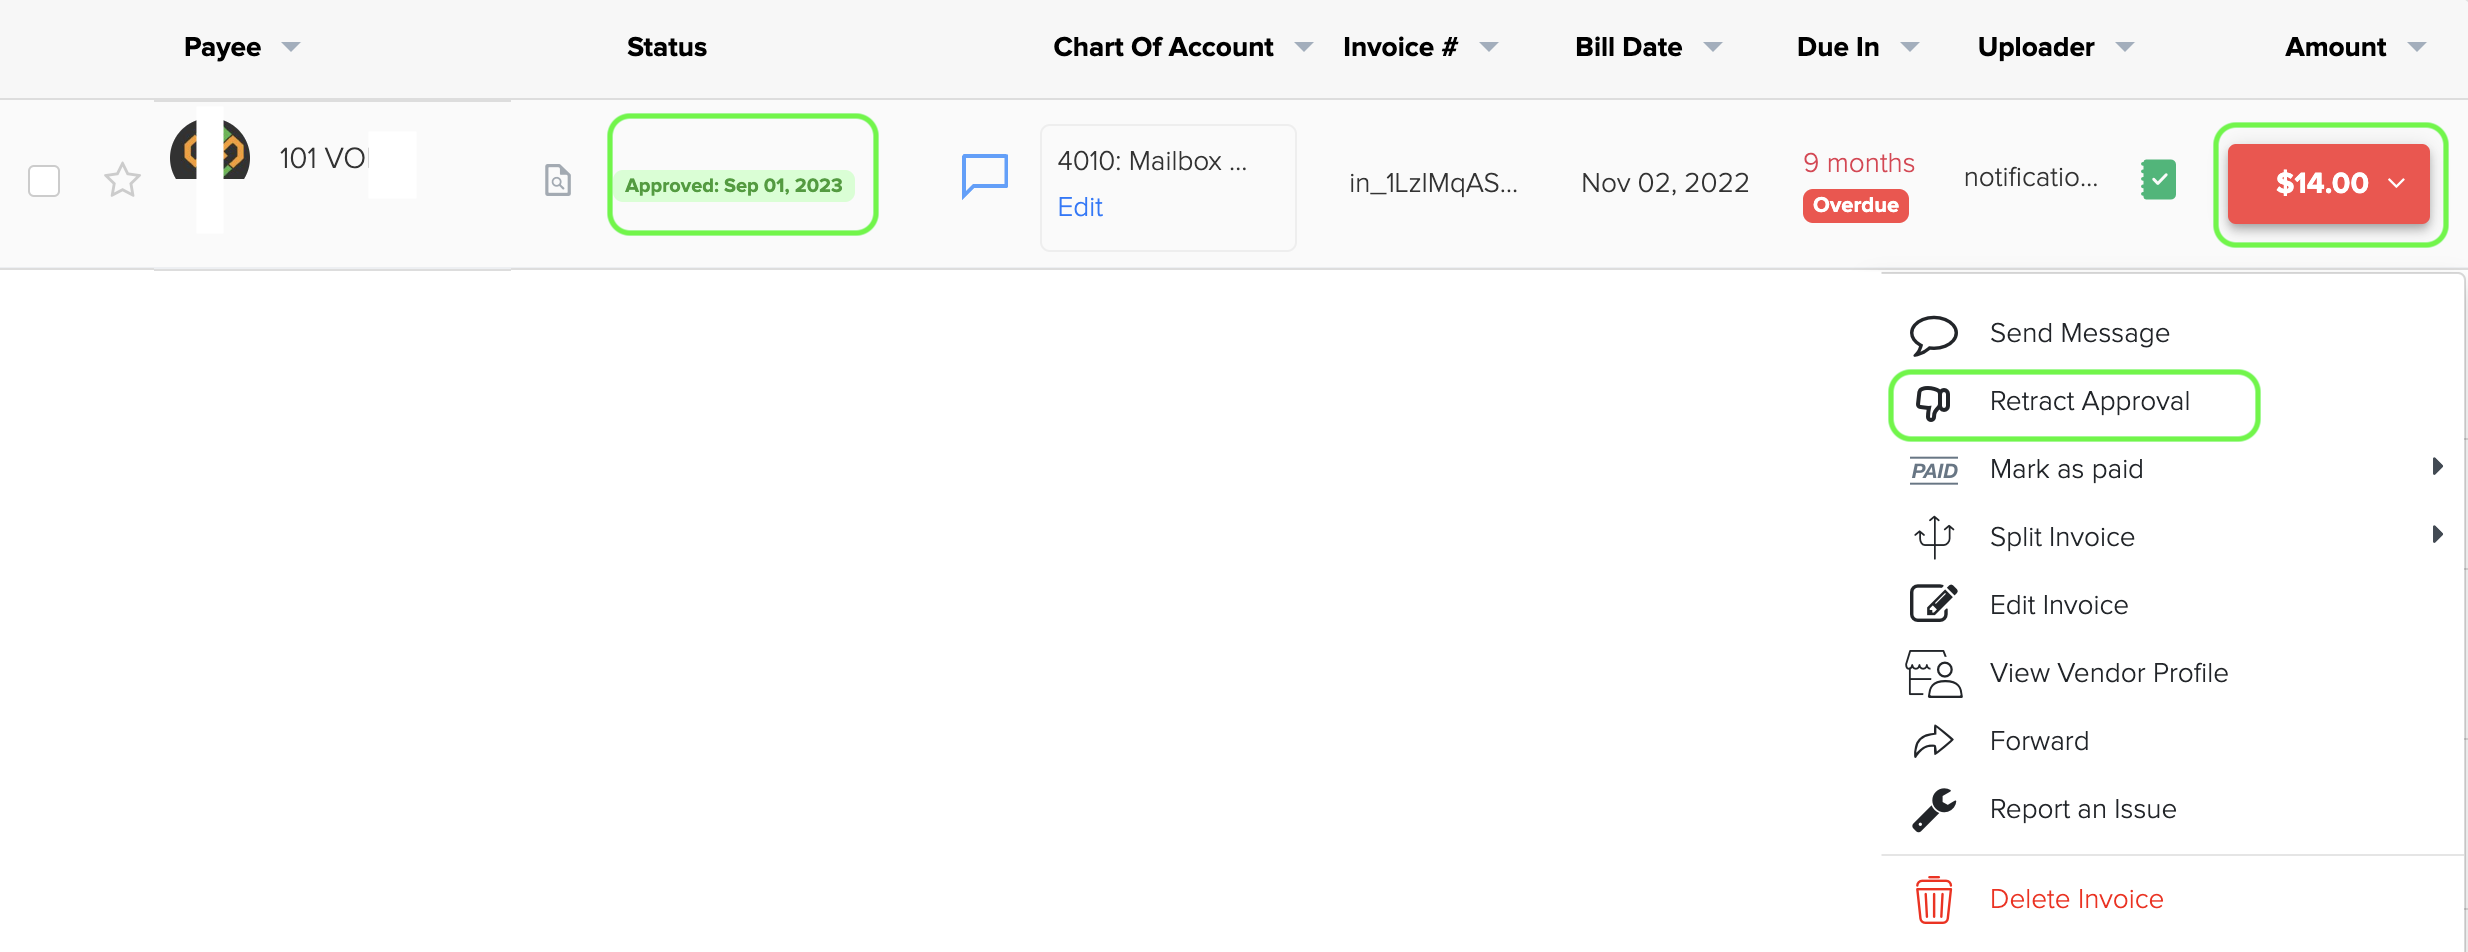
- Approvers have the ability to retract their approval for an invoice if it has not been paid yet. To do this, simply click on the 'Retract Approval' option in the menu. This will reverse the approval and un-approve the invoice.


13. Once invoices have been verified, they are automatically pushed to QBO to ensure seamless integration and accuracy in your accounting system.
14. If there are multiple approvers for an invoice, the invoice will only enter the 'Approved' state after all approvers have given their approval. Once all approvers have approved the document, the status of the invoice changes from 'Needs Approval' to 'Ready to Pay' for the Payers.
15. Additionally, you may find it helpful to refer to the following pages: